From Installation to Domain Controller: Remarkable Windows Server 2022 Home Lab Setup
Table of Contents
- Introduction
- Active Directory Basics
- Getting Started with Add Roles and Features
- Before You Begin
- Installation Type
- Select Destination Server
- Select Server Roles
- Select Features
- Active Directory Domain Services (AD DS)
- Remote Access
- Remote Access Role Services
- DNS Server
- Web Server (IIS)
- Web Server Role Services
- Confirmation
- Installation Progress
- Promote This Server to a Domain Controller
- Active Directory Domain Services Configuration Wizard
- Working with Active Directory Users and Computers
- How to Open ADUC
- Creating an Organizational Unit (OU)
- What is an OU?
- Creating Groups in Organizational Units (OUs)
- What is a Group?
- Group Scope Options
- Group Types
- Example in Our Lab
- Creating a New User in Active Directory
- How to Create a New User
- Logging In with the New User
- Conclusion
Introduction
In our last blog, we successfully set up Windows Server 2022 on a virtual machine, fixed common installation issues, and logged in for the very first time. That was our starting point—getting the server up and running in a home lab environment.
Now, it’s time to take the next step and transform our fresh installation into a fully functional server. In today’s journey, we’ll explore the “Add Roles and Features” wizard in Windows Server 2022. This is where we assign the server specific responsibilities, such as acting as a DNS server, managing users and computers through Active Directory Domain Services (AD DS), enabling Remote Access, and controlling settings across the network with Group Policy Management.
By the end of this guide, you’ll have a clearer understanding of what roles and features are, why they’re important, and how to install the key ones needed for building your own domain environment in a home lab.
What is Active Directory?
Before we start adding roles and features, it’s important to understand the backbone of many Windows Server environments—Active Directory.
Think of Active Directory (AD) as the control center of your network. It’s where all the important information about users, computers, and resources is stored and managed. Instead of setting up every single computer one by one, AD allows you to manage everything centrally.
For example:
-
You can create user accounts so everyone logs in with their own ID and password.
-
You can join multiple computers to the same domain, so they all follow the same rules.
-
You can apply policies (like password strength or desktop restrictions) across every system in your lab.
In short, Active Directory saves time, keeps things organized, and makes managing many devices much easier—even if you’re just practicing in a home lab.
-
Getting Started with Add Roles and Features
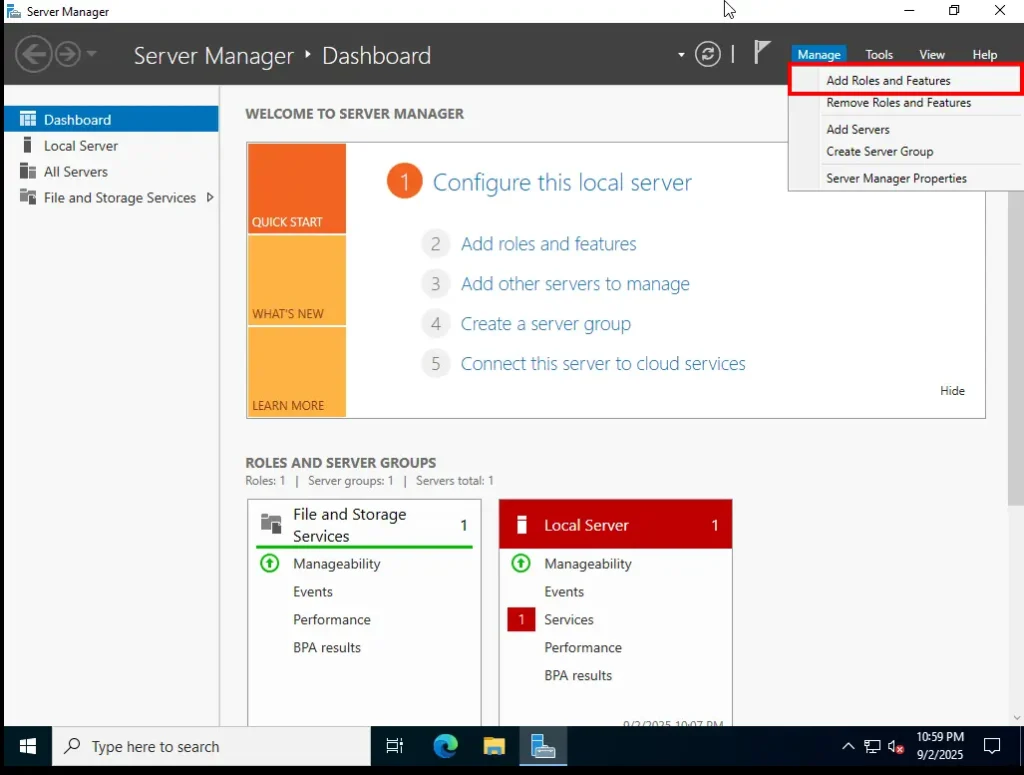
Once your Windows Server 2022 is set up and running, the first screen you’ll usually see is the Server Manager Dashboard. This is the main control panel where you manage your server.
To begin adding roles and features:
-
Look at the top-right corner of the dashboard.
-
Click on Manage.
-
From the drop-down menu, select Add Roles and Features.
This will launch the setup wizard, which guides you step by step in choosing what roles and features to install on your server.

After clicking Add Roles and Features, the setup wizard will open. This wizard guides you through the process of installing new server roles and features. Let’s walk through it step by step.
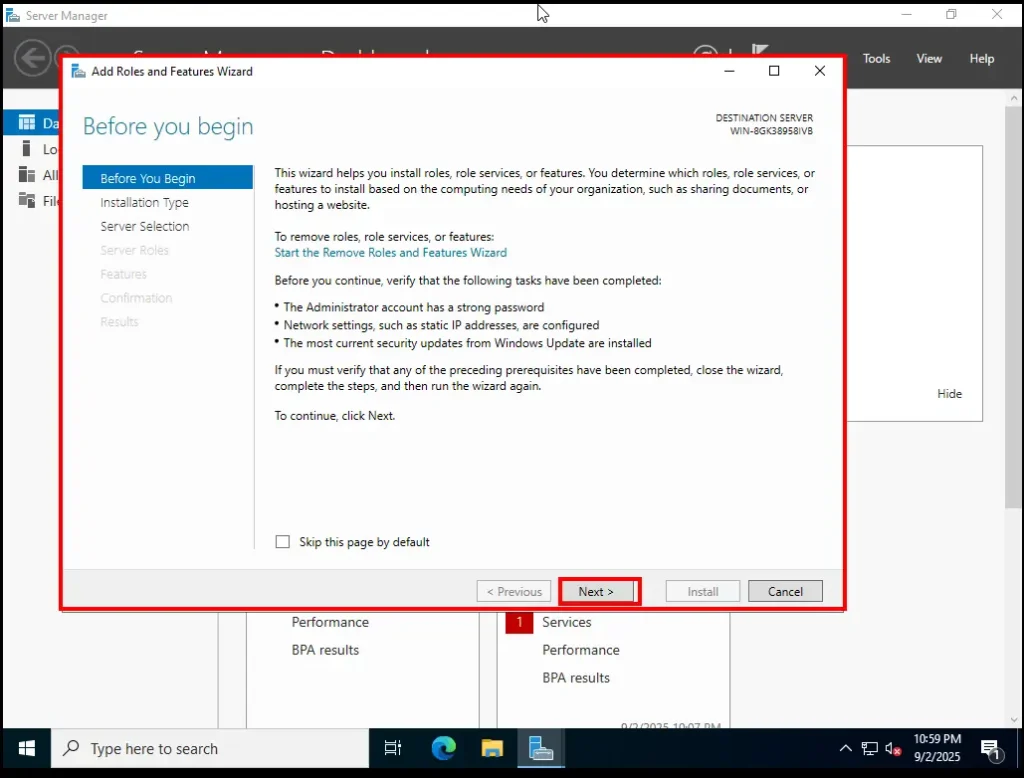
1. Before You Begin
The first page is just an introduction. Nothing to change here—simply click Next.
2. Installation Type
On the next window, you’ll be asked to choose the installation type. You’ll see two options:
-
Role-based or feature-based installation ✅
-
Remote Desktop Services installation ❌
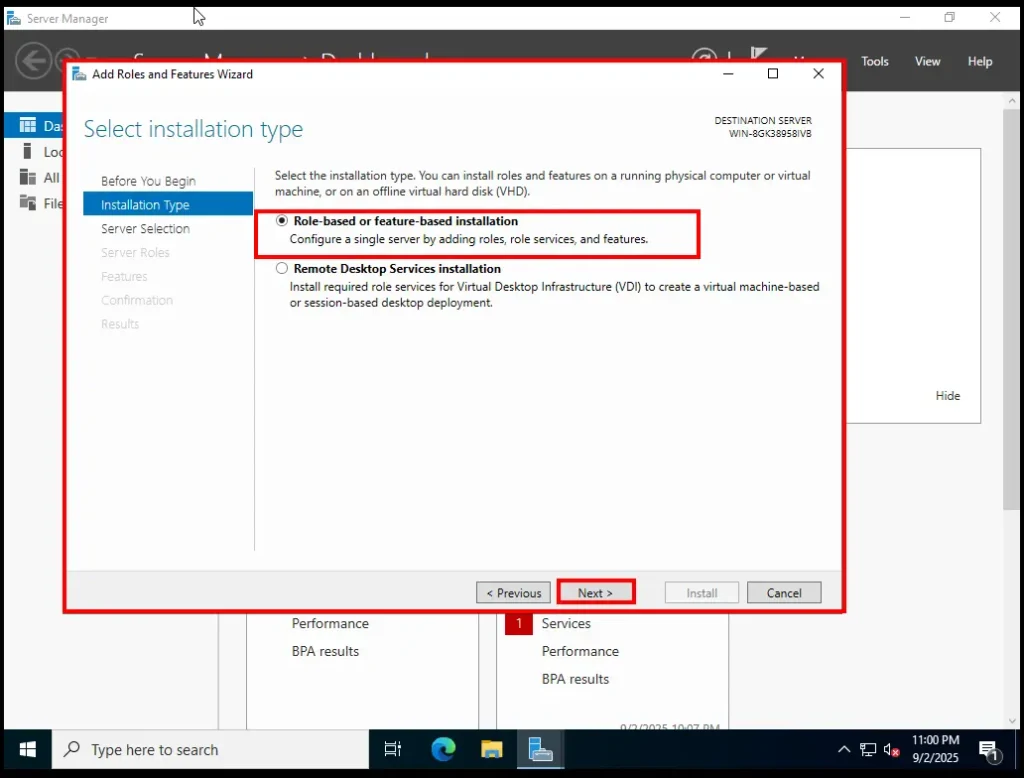
What do these mean?
-
Role-based or feature-based installation
This is the standard option and the one we need. It lets you add roles like DNS, Active Directory Domain Services, and features like Group Policy Management directly to your server. -
Remote Desktop Services installation
This option is used when you want your server to provide virtual desktops or apps to multiple users (like a remote work setup where people log in and get a Windows desktop streamed from the server). It’s more advanced and not needed for building a simple home lab.
👉 That’s why we choose Role-based or feature-based installation and click Next.
3. Select Destination Server
On the next screen, the wizard asks you to select the destination server—in other words, decide which server you want to install the roles and features on.
You’ll see two options here:
-
Select a server from the server pool ✅
-
This option shows you a list of servers that are part of your network or lab (in our case, the Windows Server we just set up).
-
Since we are working on our own server VM, we’ll choose this option.
-
-
Select a virtual hard disk ❌
-
This allows you to mount a virtual hard disk (VHD) and install roles/features onto it, even if it’s not currently attached to a running server.
-
This is useful in large environments where admins prepare disks separately, but for a home lab it’s unnecessary.
-
👉 We will select Option 1 (Server from the server pool).
Below this, you’ll see your server listed under the Server Pool. Simply select it and click Next.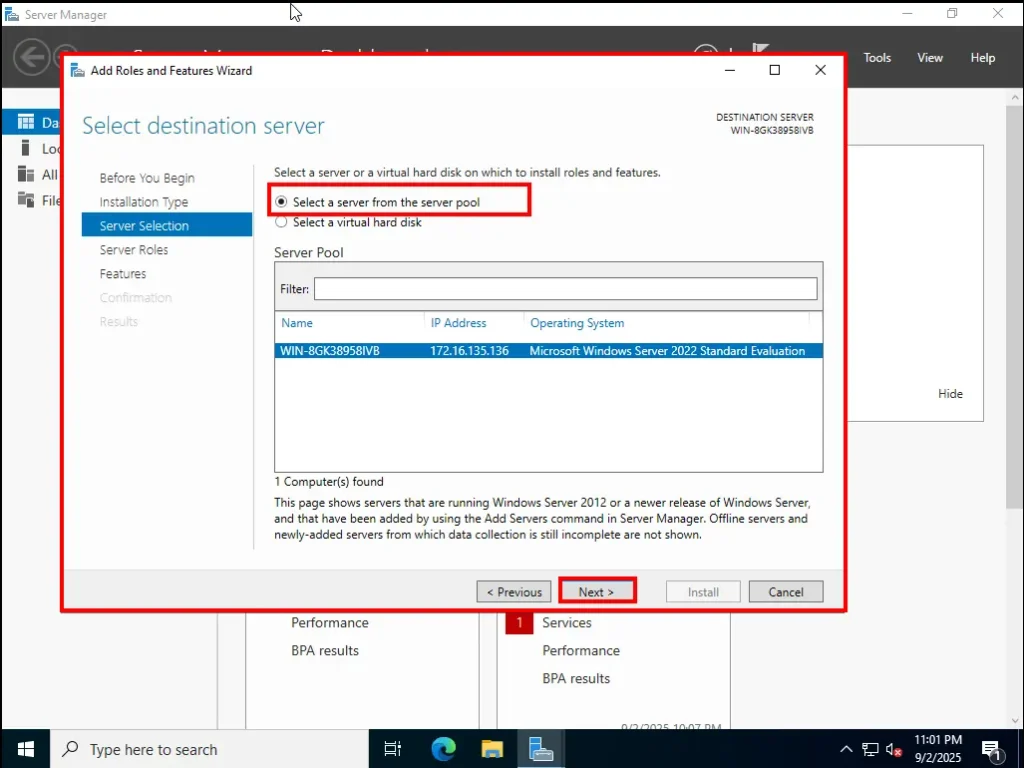
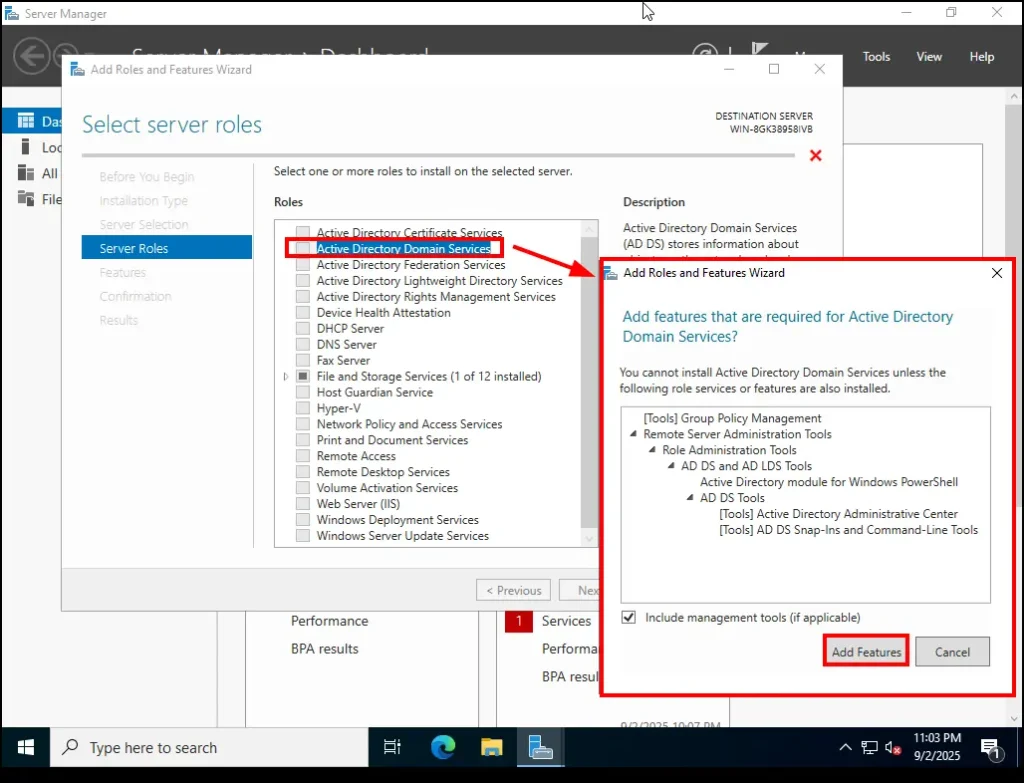
4. Select Server Roles
Now the wizard asks you to choose which server roles you want to install. This is the exciting part—this is where we decide what jobs our server will take on.
-
Active Directory Domain Services (AD DS)
-
This is the brain of our server setup. AD DS allows us to create a domain, manage users, and control computers from one central place.
-
When you check this option, a pop-up will appear asking you to add features required for Active Directory Domain Services.
-
Leave everything at the default and click Add Features.
-
-
DNS Server
-
DNS is like a phonebook for the network—it translates names (like veildefender.local) into IP addresses.
-
AD DS depends on DNS to work properly, which is why we add this role alongside it.
-
If another window opens asking to add features, leave defaults and click Add Features.
-
-
Remote Access
-
This role allows us to set up secure connections, such as VPN or routing, so we can access our lab network remotely.
-
For a lab setup, it’s useful to practice and understand how remote connectivity works.
-
Again, if the wizard asks for additional features, simply accept defaults and click Add Features.
-
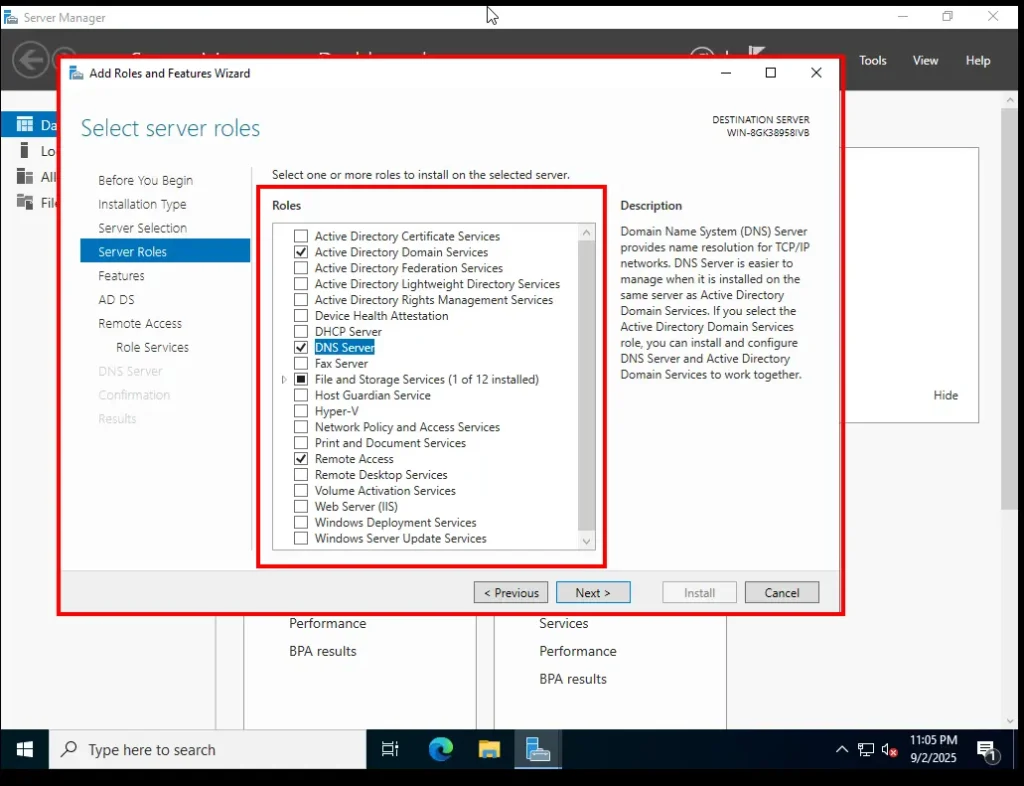
👉 By the end of this step, we will have selected three key roles:
-
Active Directory Domain Services
-
DNS Server
-
Remote Access
Then, click Next to continue.
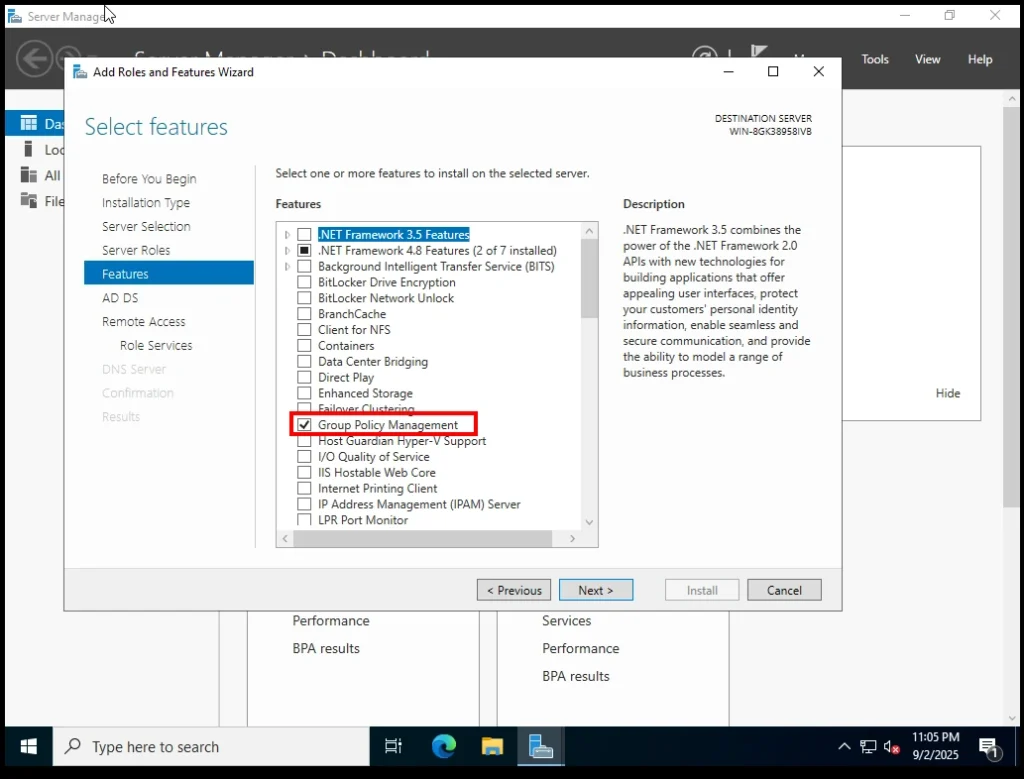
5. Select Features
On this screen, you’ll see a long list of optional features. Some are already selected by default (because they’re required by the roles we chose earlier).
👉 For our home lab, the only additional feature we need to select is Group Policy Management.
-
Why Group Policy Management?
Because it allows us to easily create and manage rules (policies) for all the computers and users in our domain. For example, you could enforce password rules, block certain apps, or set default wallpapers. For a home lab, this single feature is more than enough to practice and understand centralized management.
⚠️ Important: Don’t uncheck the features that are already selected by default. They are automatically required for the roles we picked earlier.
Click Next to continue.
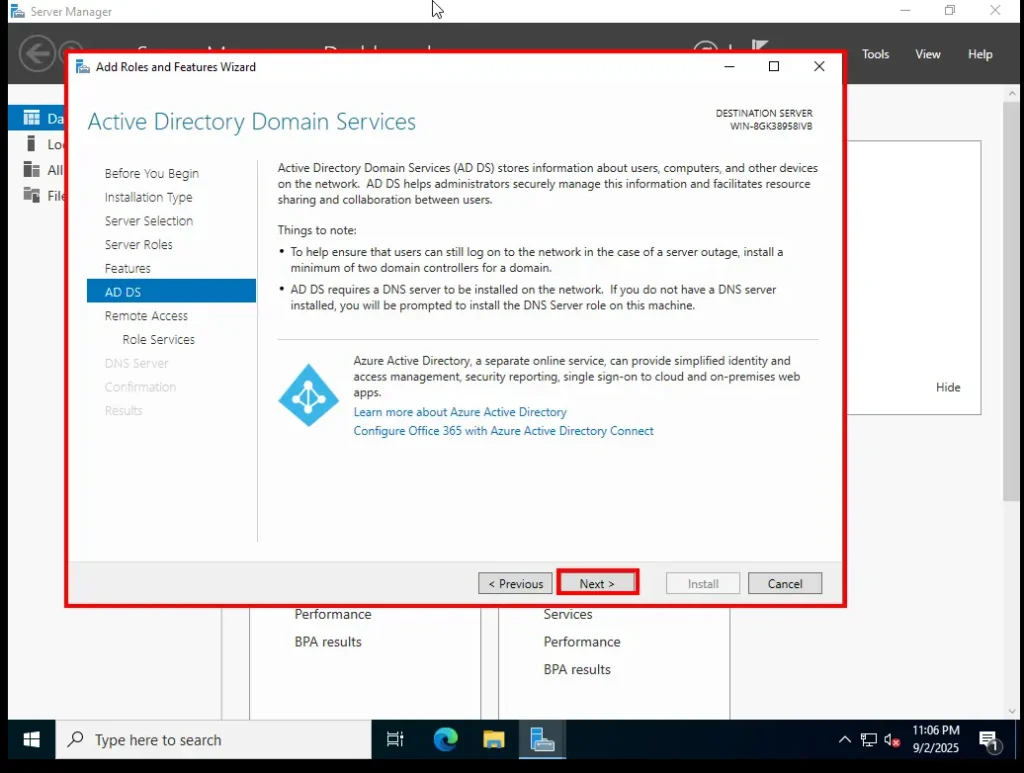
6. Active Directory Domain Services (AD DS)
The next screen introduces AD DS. Here you’ll get a short explanation about what Active Directory is and why it’s needed.
No action is required here—just review the information and click Next.
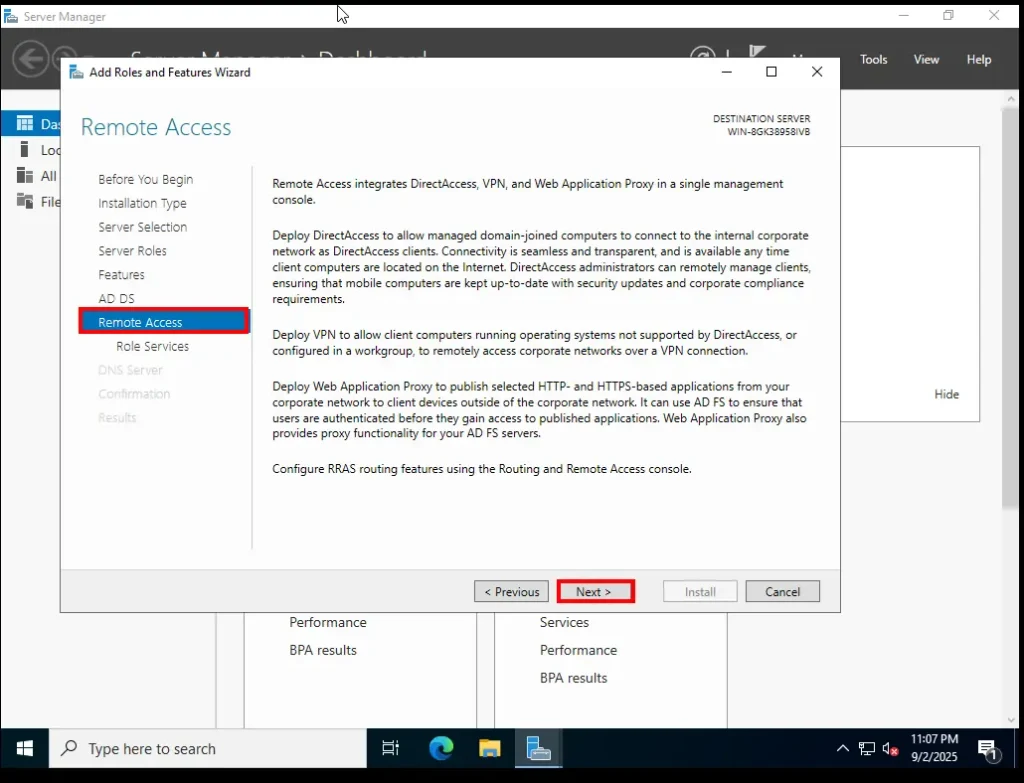
7. Remote Access
Now you’ll see an introduction screen for Remote Access. This role allows the server to provide secure connections like VPN and routing.
Again, this is just an informational screen—read through it and click Next.
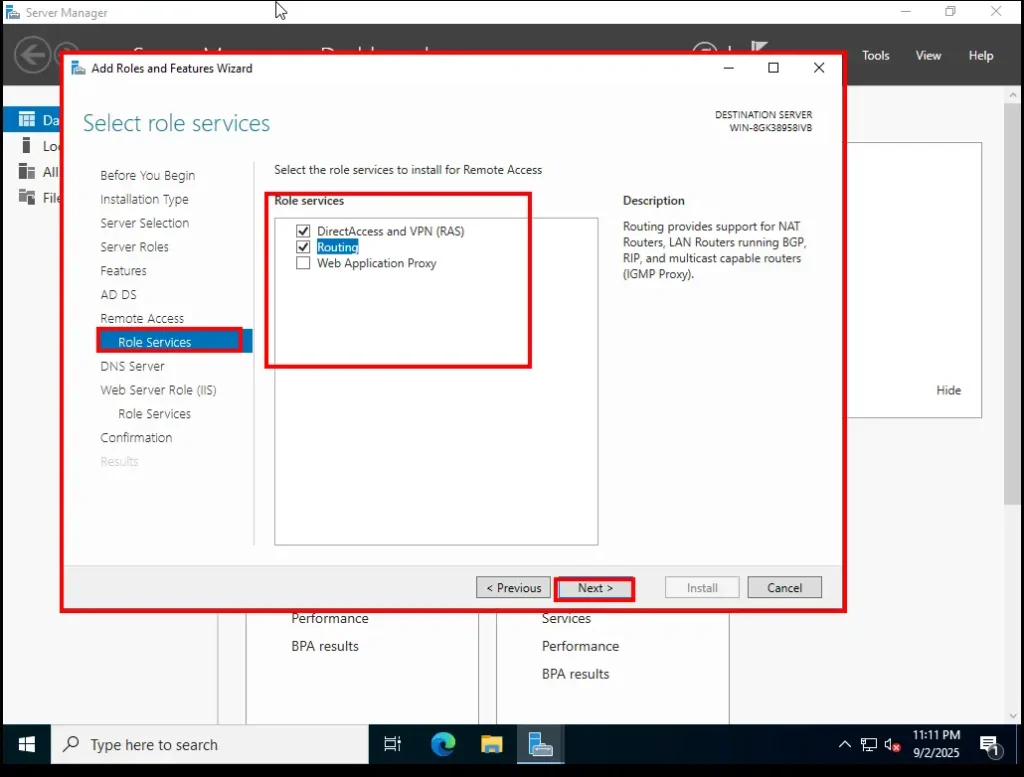
8. Remote Access Role Services
Here, the wizard asks you to select which role services you want to install under Remote Access.
-
✅ Check Routing
-
The option DirectAccess and VPN (RAS) will be auto-selected when you choose Routing. Leave it as it is.
👉 Why Routing?
Routing allows internal traffic from your domain to flow properly. It handles things like NAT (Network Address Translation), which makes it possible for computers in your AD DS environment to communicate with each other and with outside networks.Click Next to continue.
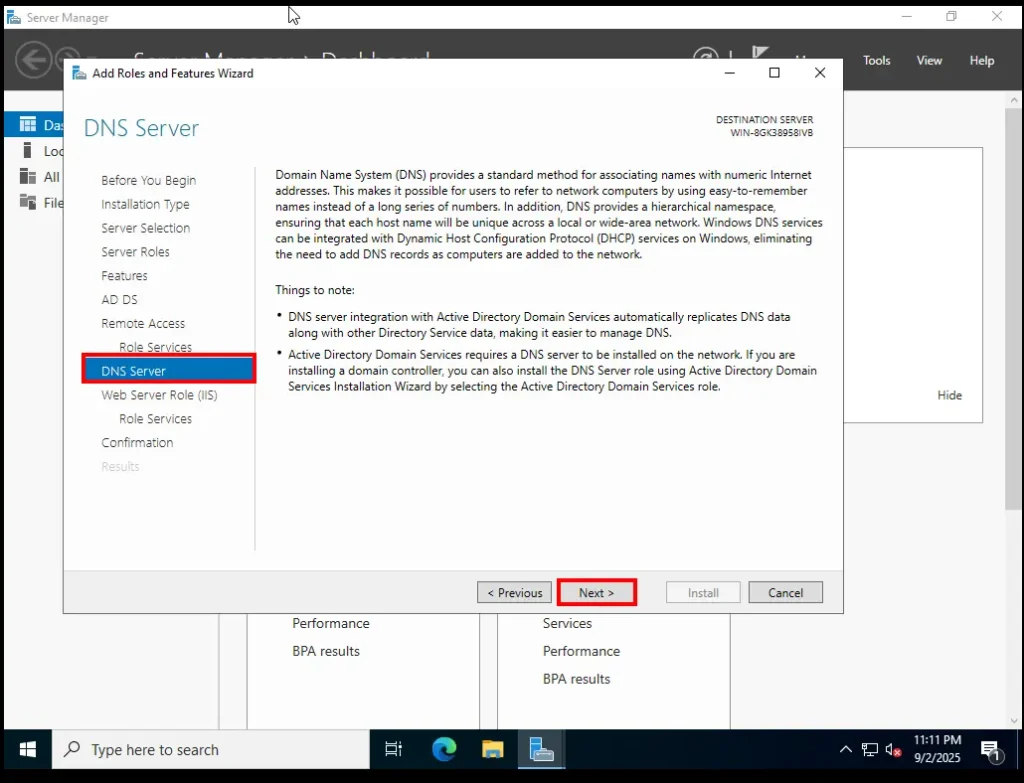
9. DNS Server
Now the wizard shows the introduction to the DNS Server role. DNS is essential for Active Directory—it translates names (like
veildefender.local) into IP addresses so everything can find each other on the network.Read through the intro and click Next.
10. Web Server (IIS)
The wizard also shows a screen for Web Server (IIS). This isn’t our main focus right now, but it is sometimes included because certain services rely on it.
No changes are needed here—just click Next.
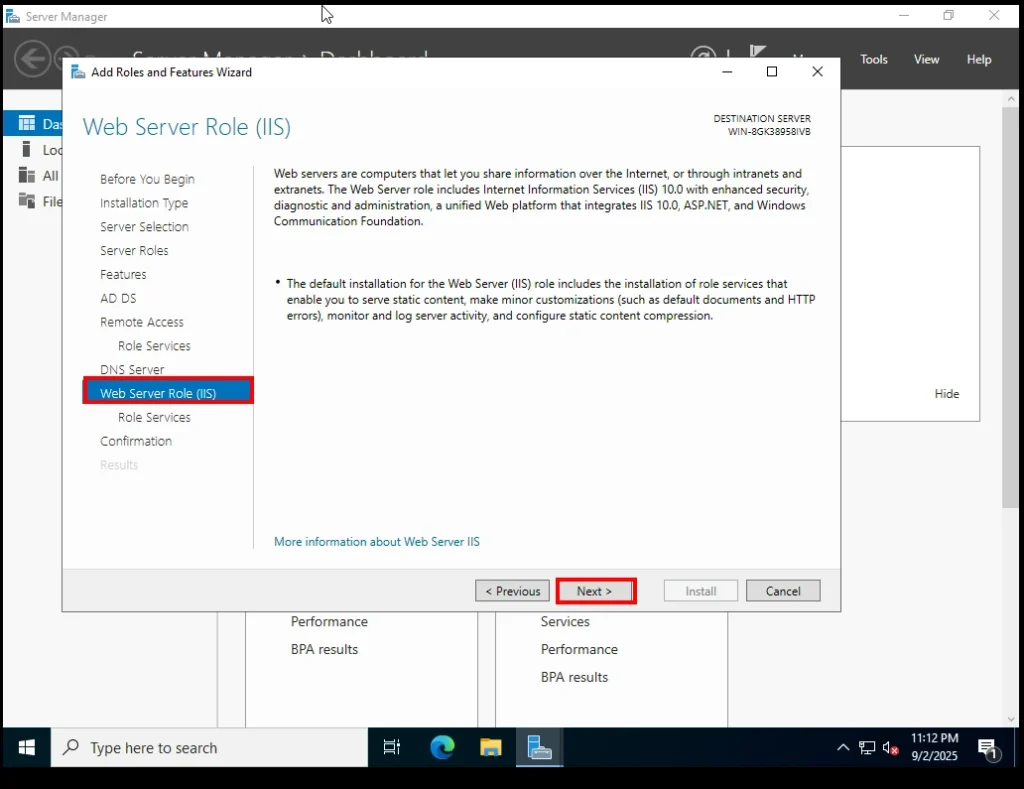
11. Web Server Role Services
Here you’ll see a list of role services under IIS. Some are already selected by default.
👉 Do not uncheck anything—just go with the default selections and click Next.
Select the Role Services to install for web server 12. Confirmation
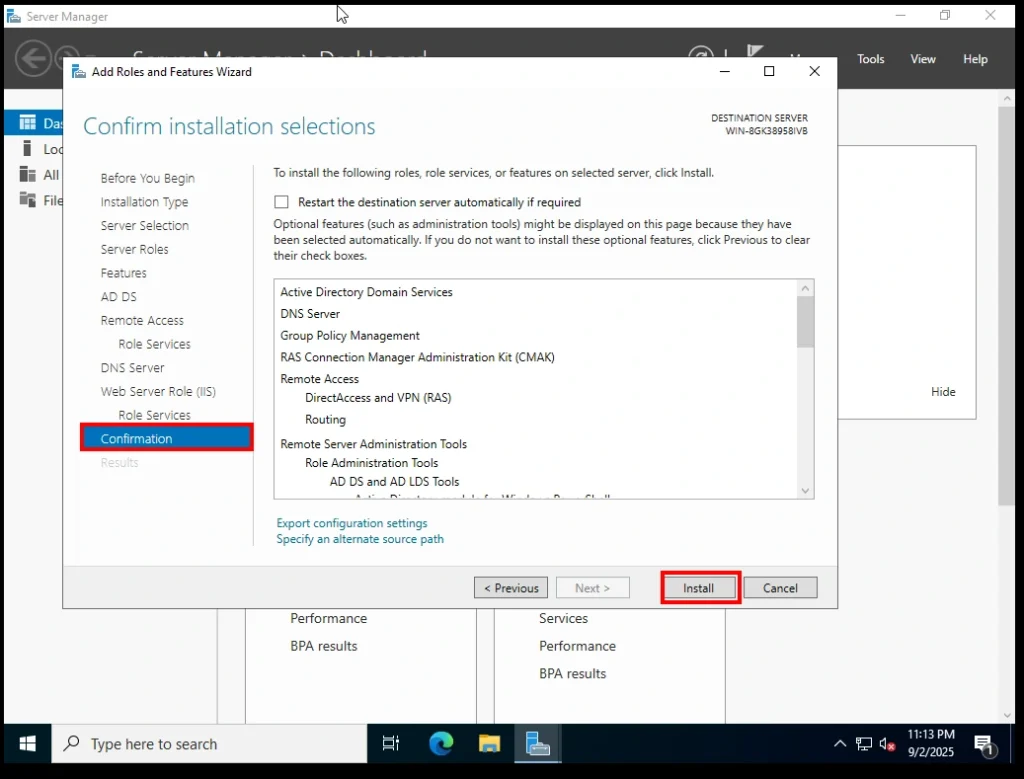
Finally, the wizard shows you a Confirmation screen with all the roles and features you selected.
Click Install to begin the installation.
Confirm Installation Selection Widget Screen 13. Installation Progress
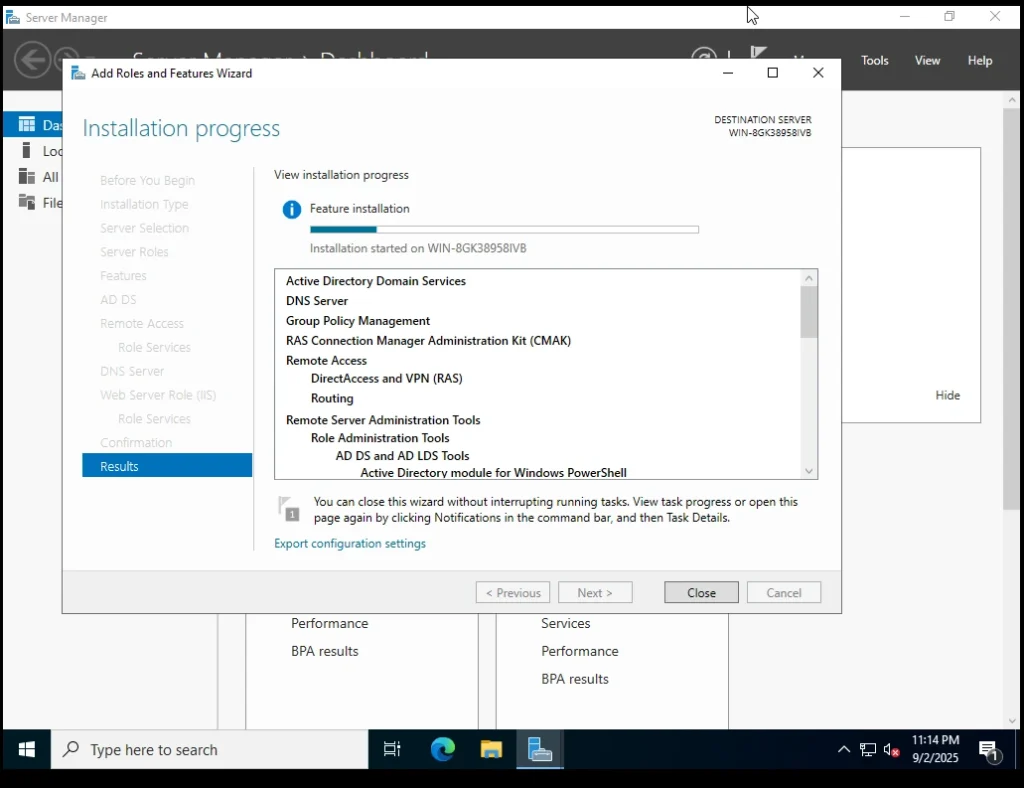
The installation will now start. You’ll see a progress bar as Windows Server adds the roles and features.
⚠️ Important: Do not close this window until the installation is complete.
Once finished, you’ll see a success message confirming that the roles and features have been installed.
Installation Progress Widget Screen 14. Promote This Server to a Domain Controller
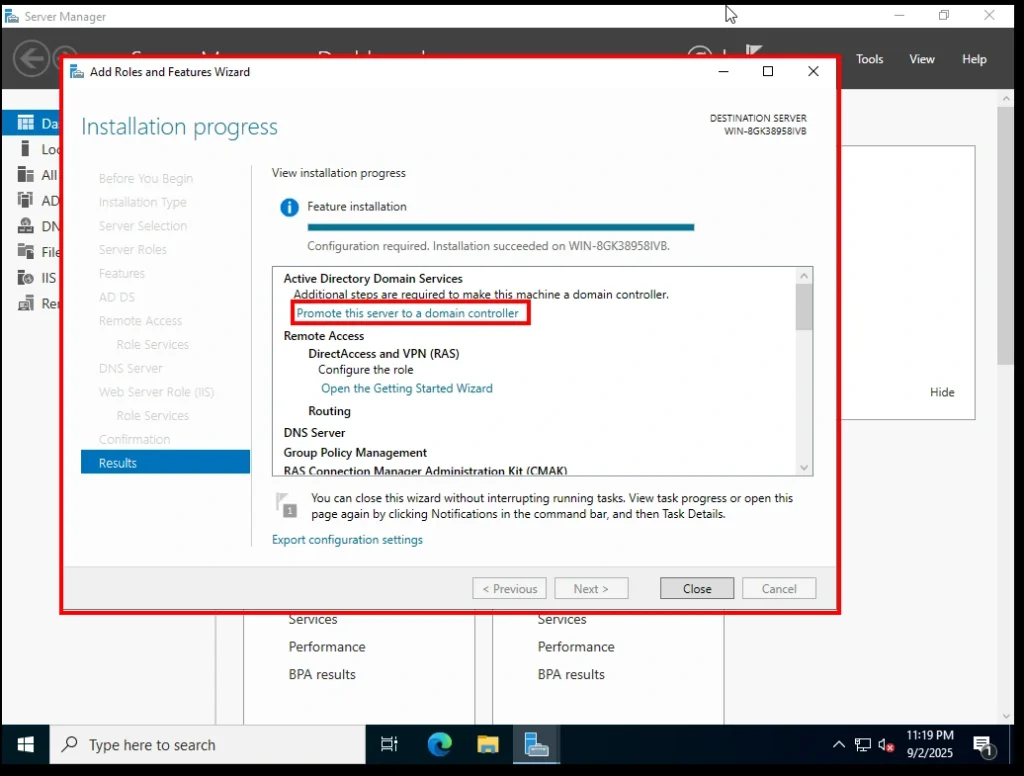
Once the installation is complete, you’ll notice a yellow warning flag at the top of the Server Manager Dashboard. It includes an option that says:
“Promote this server to a domain controller.”What does that mean?
A Domain Controller (DC) is the heart of an Active Directory environment. It’s the server that stores all the user accounts, enforces security policies, and authenticates logins across the network. Without promoting your server to a domain controller, Active Directory Domain Services (AD DS) won’t actually start working.Click on Promote this server to a domain controller to begin the configuration.
Promote this Server to a domain controller Active Directory Domain Services Configuration Wizard
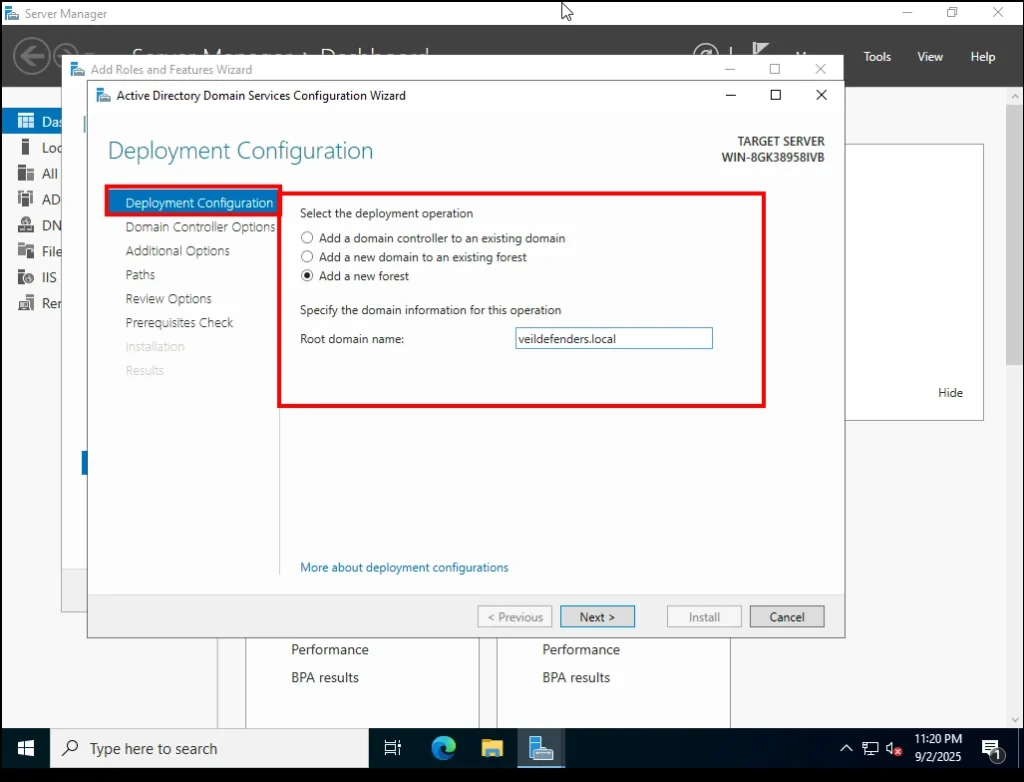
This will open the AD DS Configuration Wizard. On the first screen, you’ll see Deployment Configuration with three options:
- Add a domain controller to an existing domain
Use this if you already have a domain (like
company.local) and want this server to act as an additional domain controller for redundancy. - Add a new domain to an existing forest
Use this if you already have a forest (a collection of domains) and want to add a separate child domain under it. For example, if you have
company.local, you could addbranch.company.local. - Add a new forest ✅
This is the option we’ll select because we are starting fresh in our home lab with no existing domain. A forest is the top-level structure in Active Directory, and creating a new one means we’re building our own domain environment from scratch.
Select Add a new forest.
Next, you’ll be asked to provide a Root Domain Name. This is the main name of your domain. You can use anything you like, such as:
domain.localdomain.com- or something custom for your lab
For this lab, I’ll use:
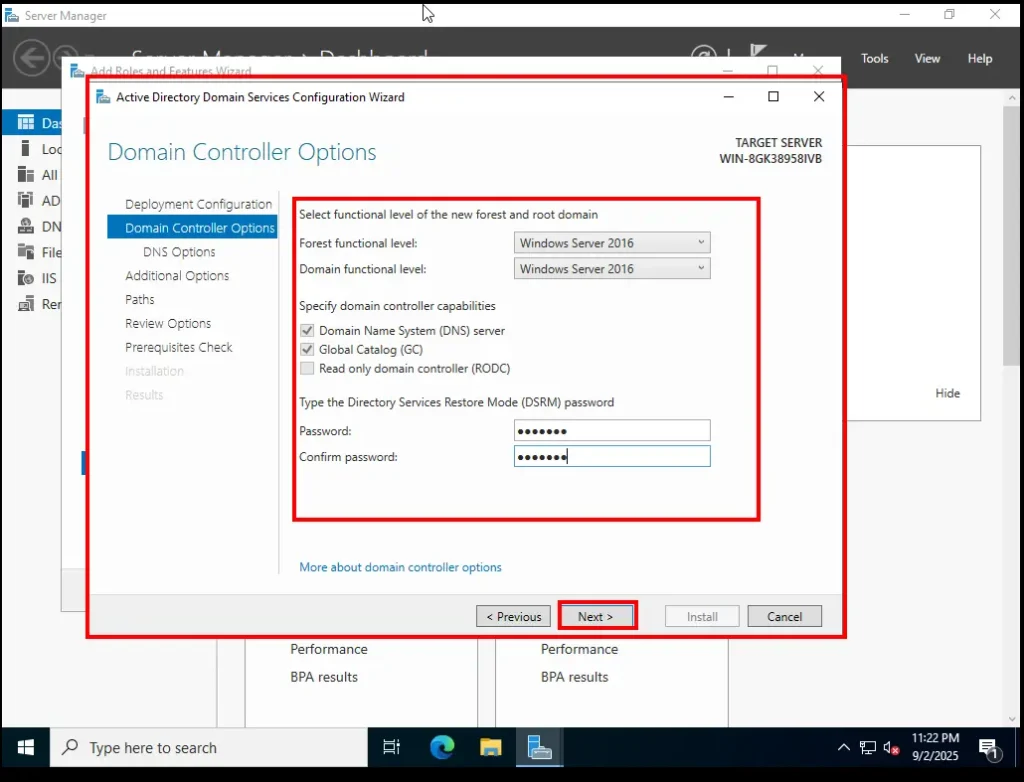
veildefender.localActive Directory Domain Services Configuration Wizard 2. Select Forest and Domain Functional Levels
On this screen, you need to choose the functional level for the new forest and root domain.
-
Forest Functional Level: This defines what features will be available across the entire forest.
-
Domain Functional Level: This defines what features will be available for your specific domain.
For a new lab setup, you can simply leave these at their defaults (Windows Server 2016 or 2019/2022 depending on your version). These defaults allow the latest Active Directory features while still maintaining backward compatibility with slightly older systems.
Below that, you’ll be asked to type a Directory Services Restore Mode (DSRM) password.
-
This password is used if you ever need to boot the domain controller into recovery mode.
-
Enter and confirm a secure password, then continue.
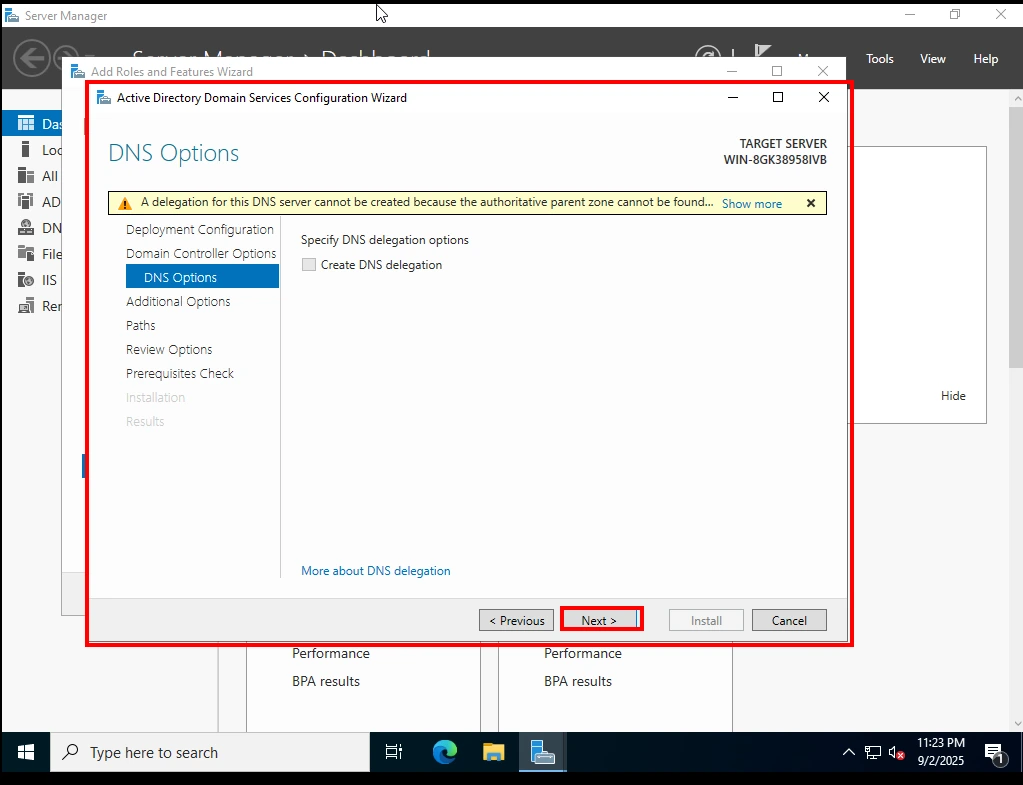
Select Forest and Domain Functional Levels 3. DNS Options
On the next screen, you may see a warning about DNS Delegation.
-
What is DNS Delegation?
DNS Delegation is when responsibility for a part of a domain namespace is handed off to another DNS server. For example, delegatingbranch.domain.localto a different DNS server. -
Why the warning?
Since we are creating a brand-new domain (veildefender.local), there’s no existing “parent” DNS zone. That’s why the wizard says:
“A delegation for this DNS server cannot be created because the authoritative parent zone cannot be found.”
This is expected in a new lab environment. Simply click Next.
DNS Options 4. Additional Options – NetBIOS Domain Name
The wizard now assigns a NetBIOS name for your domain.
-
What is a NetBIOS Domain Name?
This is the short, legacy-friendly name used by older Windows systems. For example, if your domain isveildefender.local, the wizard might assignVEILDEFENDERas the NetBIOS name.
You can leave this as the default or change it if you prefer a shorter name. For our lab, we’ll keep the default.
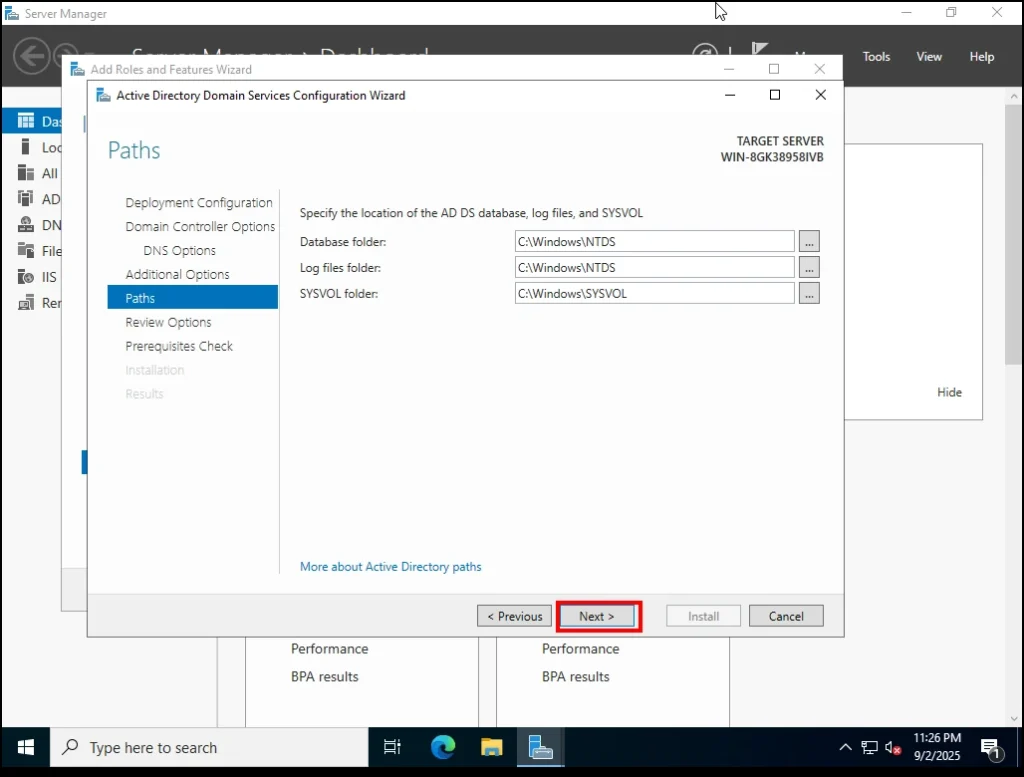
Additional Options – NetBIOS Domain Name 5. Paths
Here, you’ll see three folder locations:
-
Database Folder → Where the Active Directory database (NTDS.dit) is stored.
-
Log Files Folder → Where Active Directory keeps its transaction logs.
-
SYSVOL Folder → A shared folder that stores policies and scripts which are replicated across all domain controllers.
For a home lab, it’s fine to leave these at their default paths.
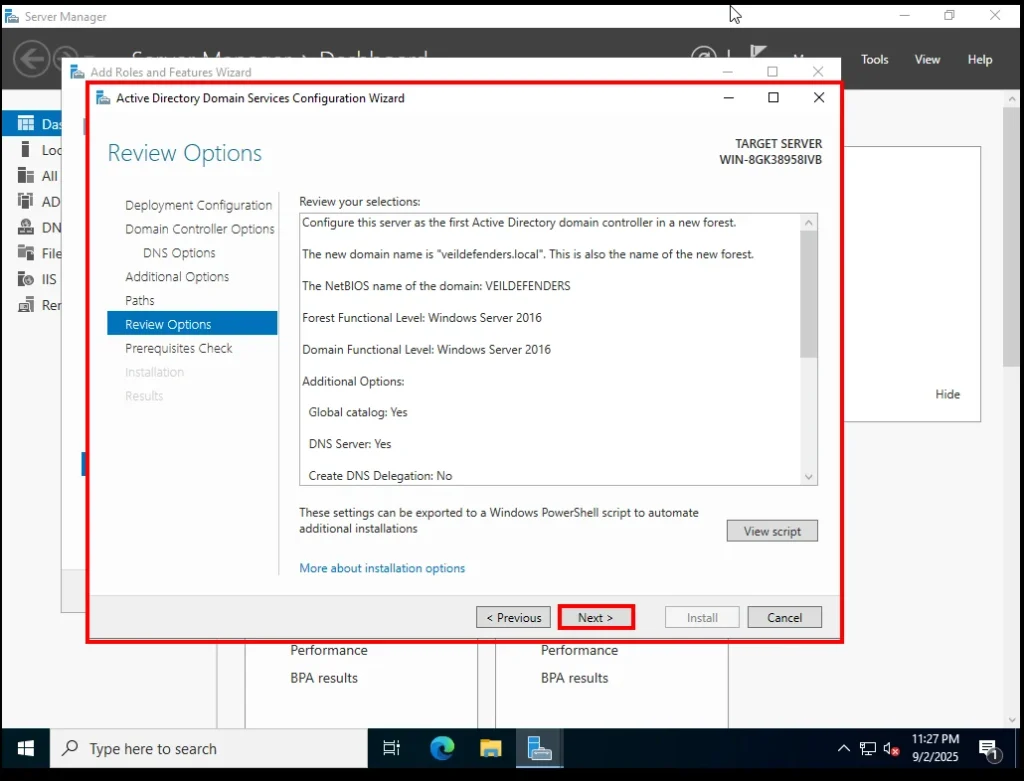
AD – DS configuration wizard Walk Through 6. Review Options
This screen simply shows a summary of all the settings you chose. Review them to confirm everything looks correct, then click Next.
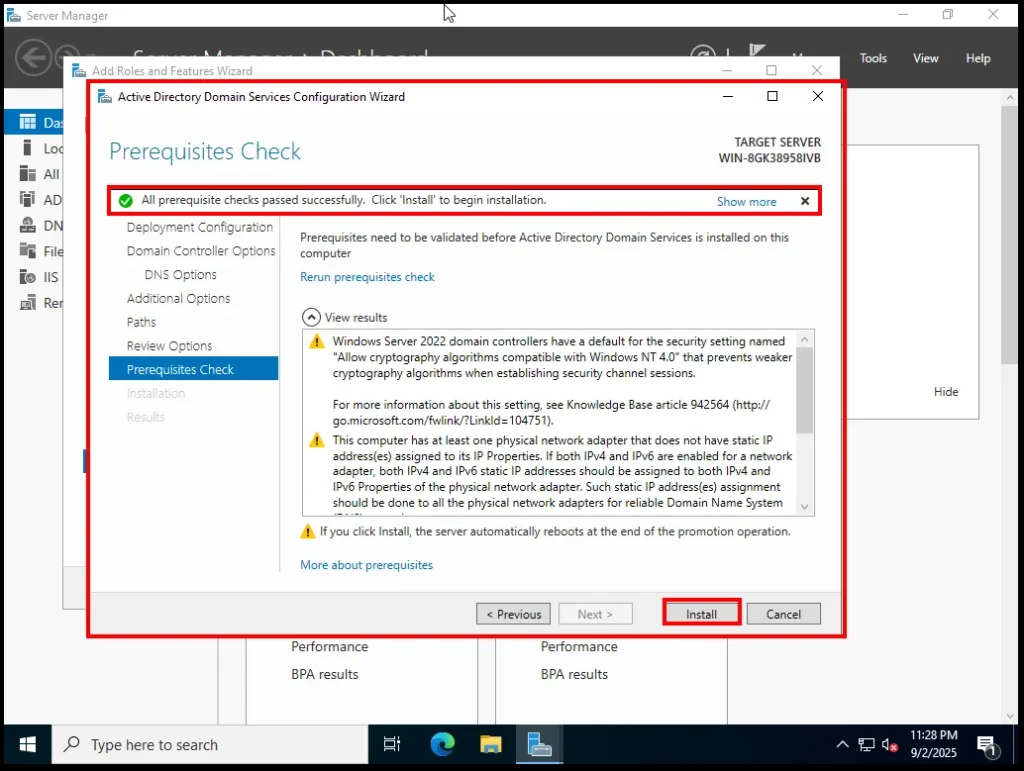
Review Option Widget Screen of AD – DS 7. Prerequisites Check
The wizard now runs a prerequisites check. If all checks are passed successfully, you’ll be able to click Install.
Prerequisites Check – Active Directory Domain Services 8. Installation
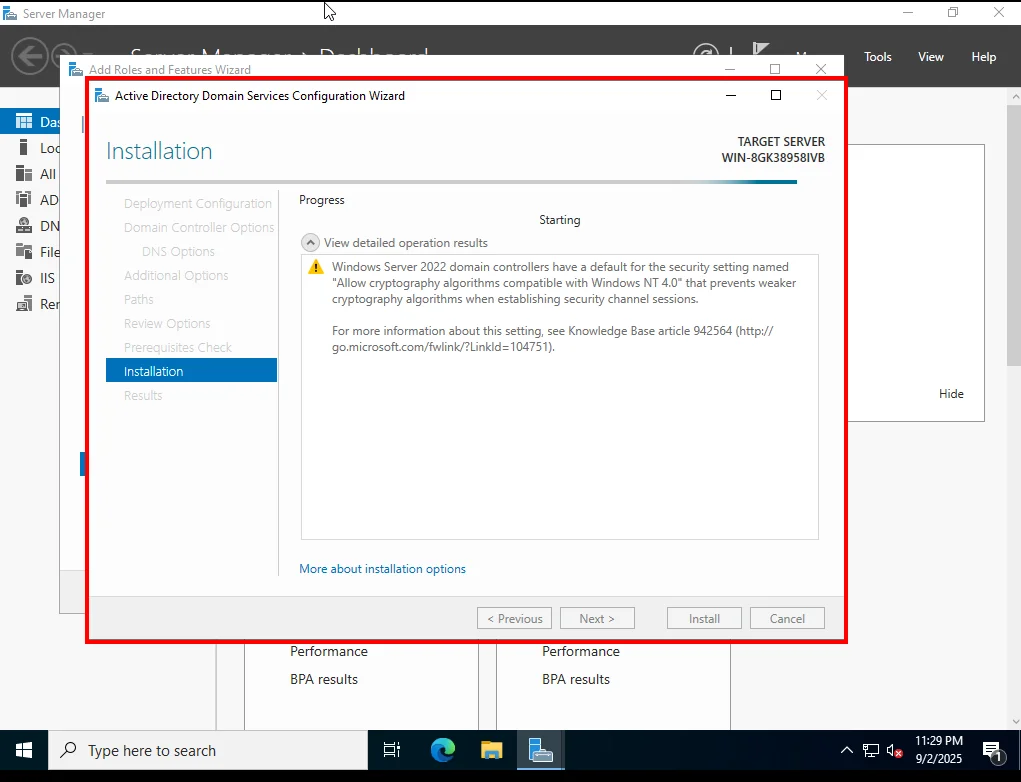
The installation will now begin. You’ll see progress as Active Directory Domain Services and DNS are configured.
⚠️ Don’t close the window during this process.
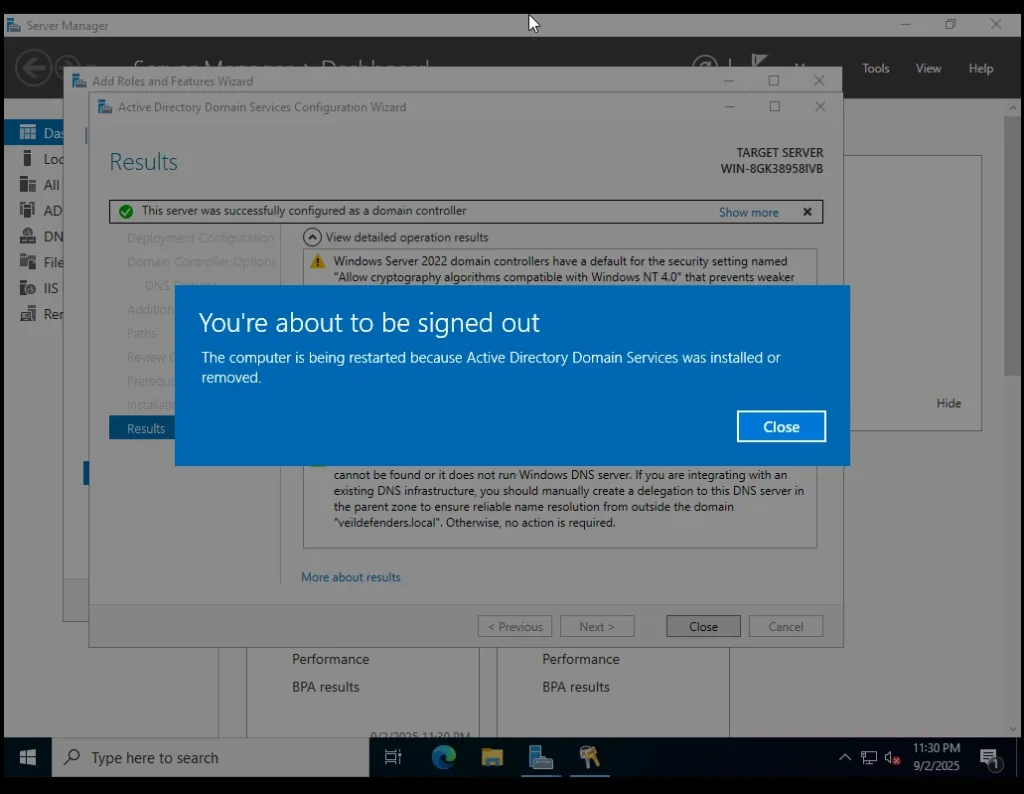
Active Directory Domain Services Configuration wizard installation Setup Once installation completes, you’ll see a message:
“You are about to be signed out.”Click Close.
Window Server Configuration Done 9. Restart and Sign In
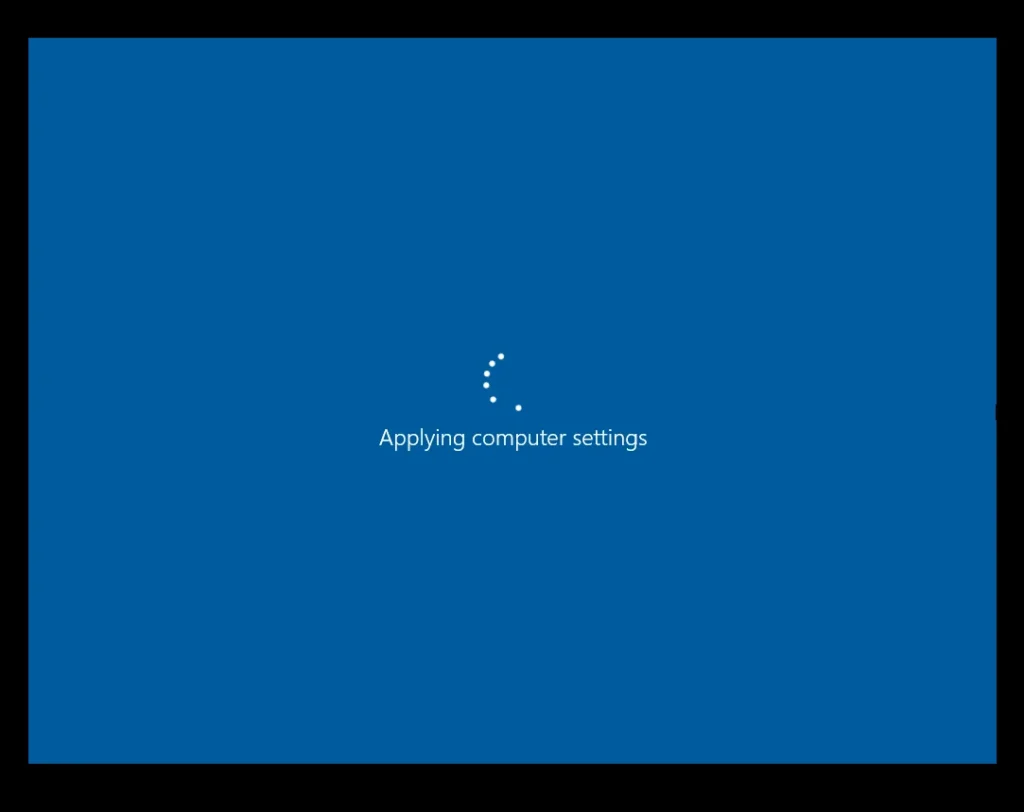
Your server will restart to apply the changes.
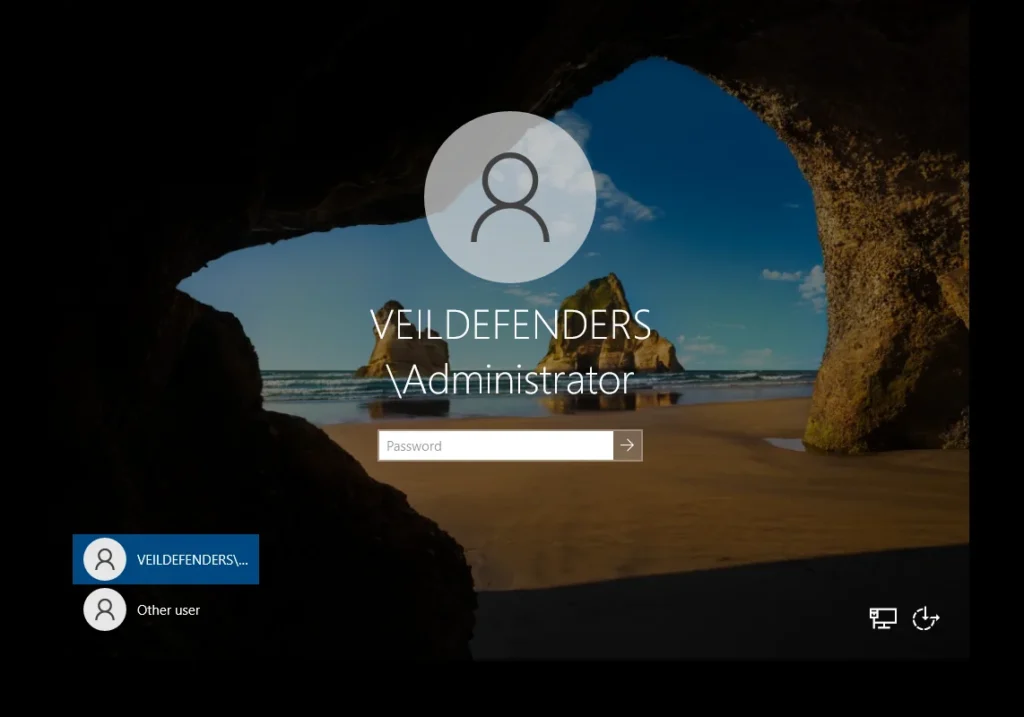
Applying all setting that we done till now After reboot, you’ll notice the login screen now shows:
VEILDEFENDER\AdministratorThis means your server is officially part of the new domain, and you can log in using the domain Administrator account.
Window Server Login Screen Working with Active Directory Users and Computers
Now that our Windows Server is fully set up and promoted to a Domain Controller, we can finally start using one of the most important tools: Active Directory Users and Computers (ADUC).
This is where you’ll manage everything—users, groups, and organizational units (OUs)—inside your domain.
-


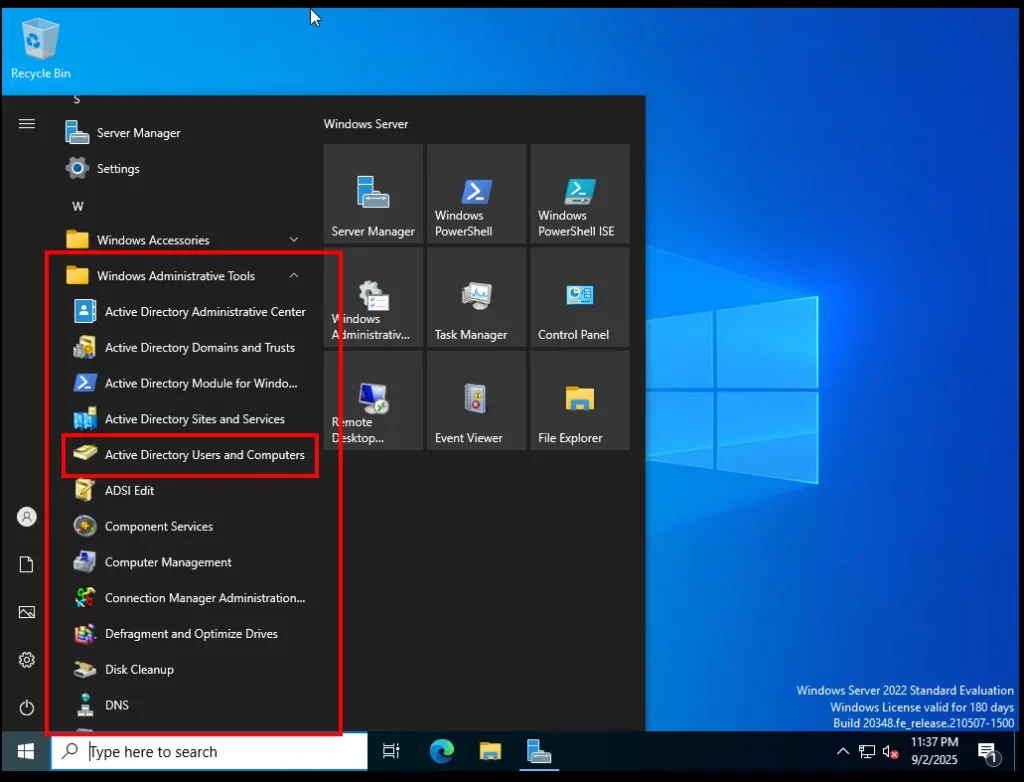
How to Open ADUC
-
Click on the Windows Start icon.
-
Search for Active Directory Users and Computers.
-
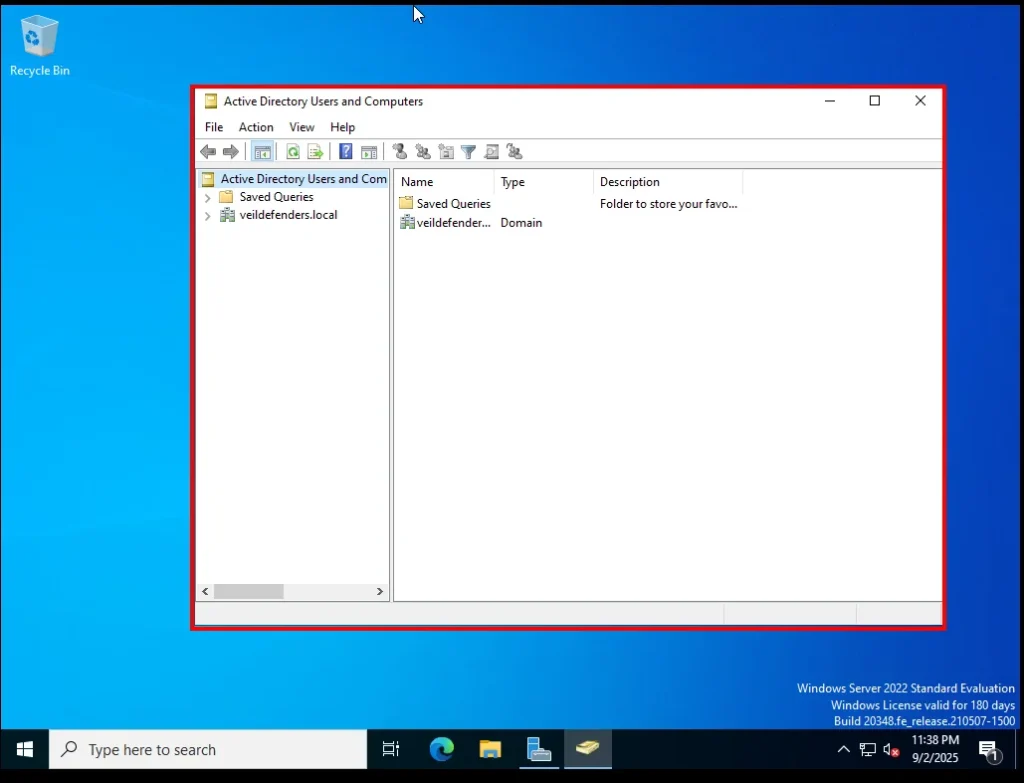
Open it, and you’ll see two main sections on the left:
-
Saved Queries (used for advanced searches)
-
veildefenders.local (this is our domain)
-
Creating an Organizational Unit (OU)
-
Expand veildefenders.local.
-
Right-click on veildefenders.local.
-
Go to New → Organizational Unit.
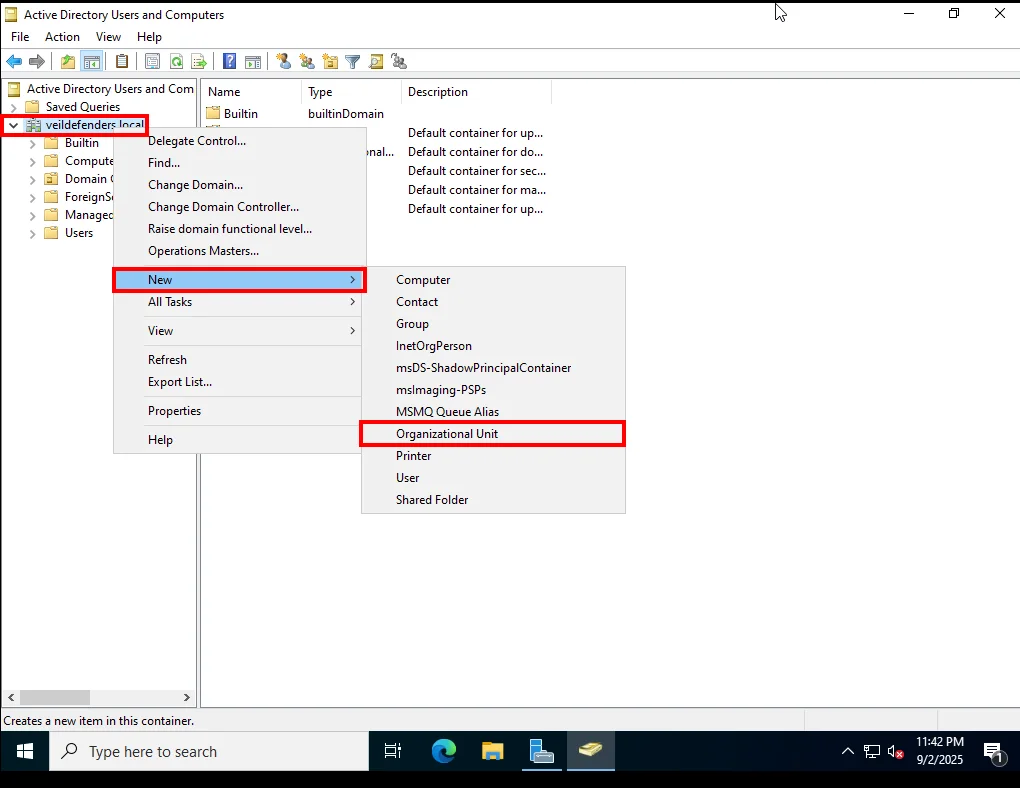
What is an OU?
An Organizational Unit (OU) is like a folder inside your domain. It helps you organize and manage objects such as users, groups, and computers.
For example:
-
You can create an OU called Students and another called Teachers.
-
Inside each OU, you place the relevant user accounts.
-
Later, you can apply Group Policies to an OU (like password rules or desktop restrictions), and those settings will only affect the users or computers inside that OU.
Think of an OU as a way to structure your network like departments in an organization—clean, organized, and easy to manage.
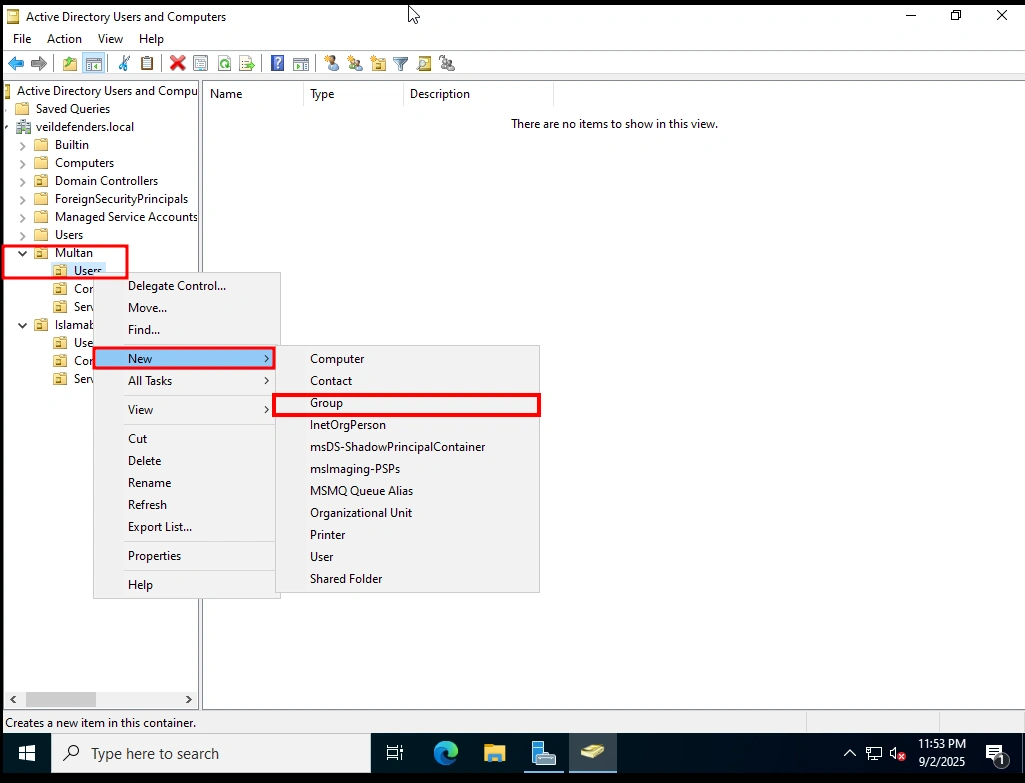
Creating Groups in Organizational Units (OUs)
Now that we’ve created our OUs (like Multan, Islamabad, Users, Computers etc.), the next step is to create Groups inside each OU. Groups help us manage users more efficiently.
What is a Group?
A Group in Active Directory is a collection of users, computers, or even other groups. Instead of assigning permissions to each user one by one, you assign them to a group—and every member of that group automatically gets those permissions.
Example: Instead of giving 10 IT staff access to a shared folder individually, you just put them in an IT Group and give permissions once.
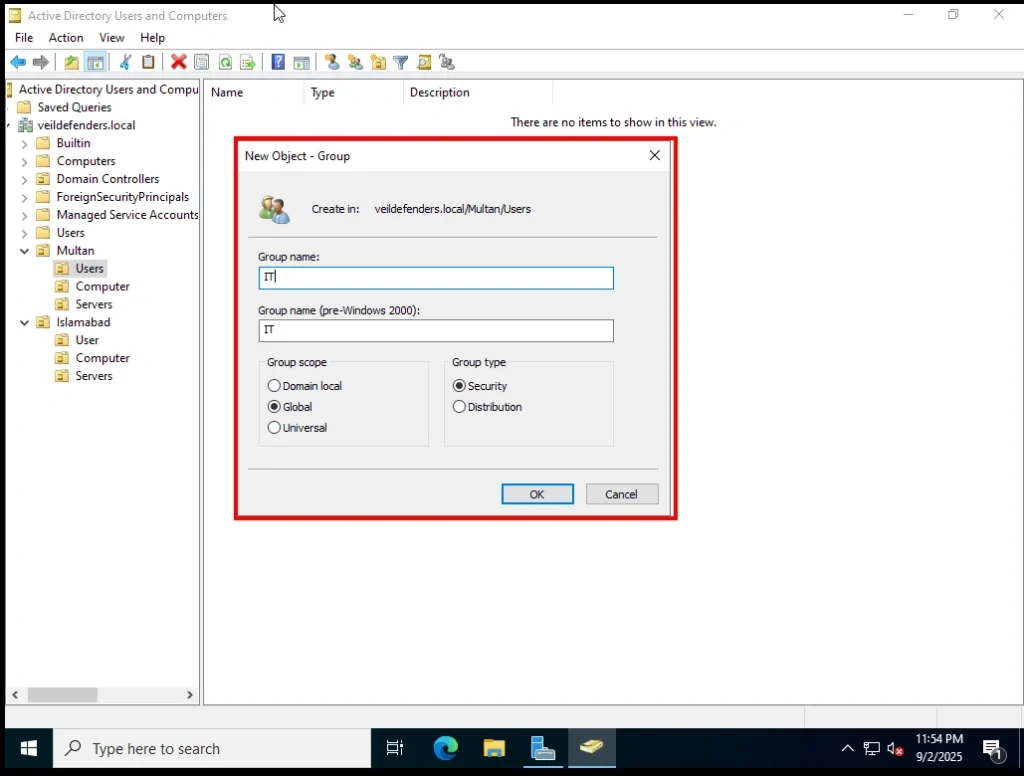
Group Scope Options
When creating a group, you’ll see three Group Scope options:
-
Domain Local
-
Used to assign permissions within the same domain only.
-
Best for resources like shared printers or folders limited to one domain.
-
-
Global
-
Used to group users within the same domain and can be assigned permissions across domains.
-
Most common choice for departmental groups (like IT, HR, Sales).
-
We select Global here because we’re creating groups for OUs in our single-domain lab.
-
-
Universal
-
Used in multi-domain environments.
-
Can contain users and groups from multiple domains in the forest.
-
Not needed for our simple home lab setup.
-
Group Types
You’ll also see two Group Types:
-
Security Groups
-
Used to assign permissions (e.g., file access, system rights, printer access).
-
Example: An IT Security Group can be given admin rights to manage systems.
-
We’ll use this for our IT group, since it needs security permissions.
-
-
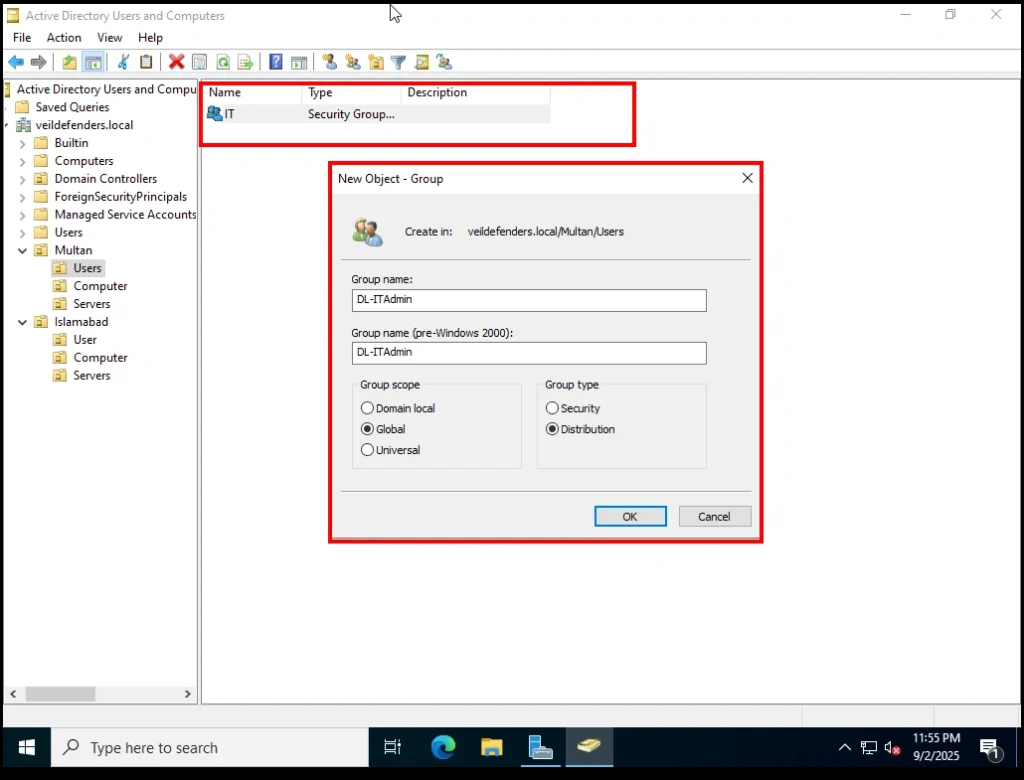
Distribution Groups
-
Used only for email distribution lists (cannot assign permissions).
-
Example: A DL-ITAdmin group could be used to send one email to all IT admins at once.
-
We’ll use this for communication purposes only.
-
Example in Our Lab
-
Security Group:
IT→ Used to manage permissions for IT staff. -
Distribution Group:
DL-ITAdmin→ Used to send emails or announcements to IT staff.
This way, we keep our environment structured:
-
OUs organize users.
-
Groups manage permissions and communication.
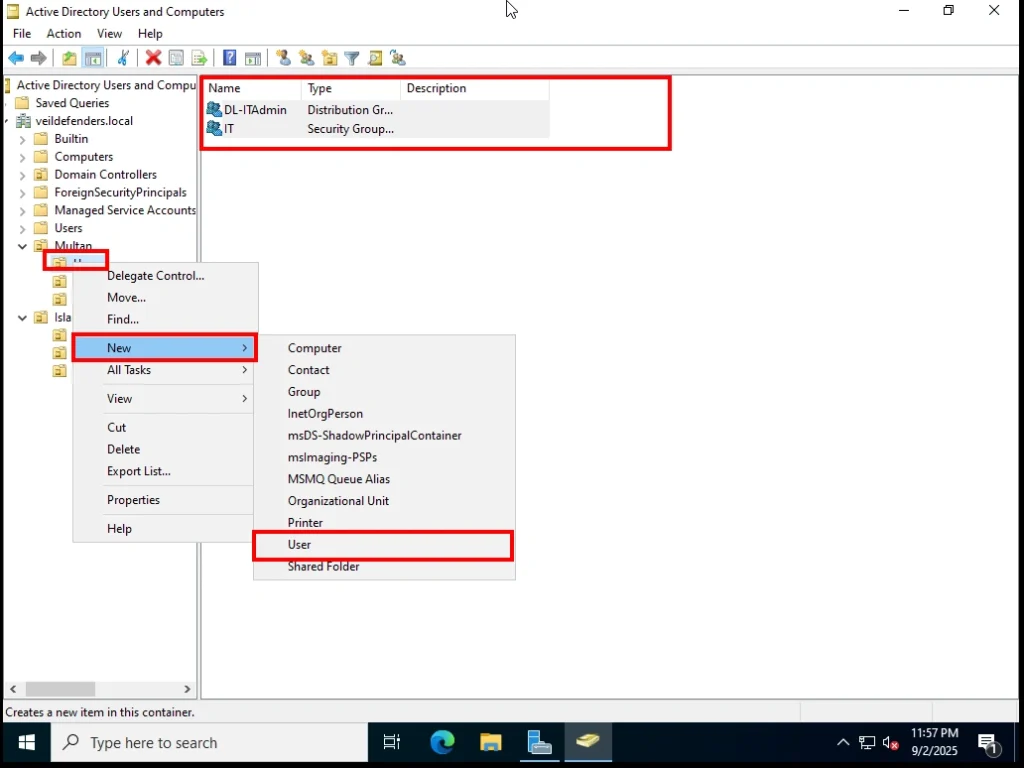
Creating a New User in Active Directory
Now that we have our OUs and Groups ready, the next step is to create users and place them inside the right OU.
How to Create a New User
-
Open Active Directory Users and Computers (ADUC).
-
Expand your domain (e.g., veildefenders.local).
-
Right-click on the OU where you want the user (for example, User, Computers).
-
Select New → User.
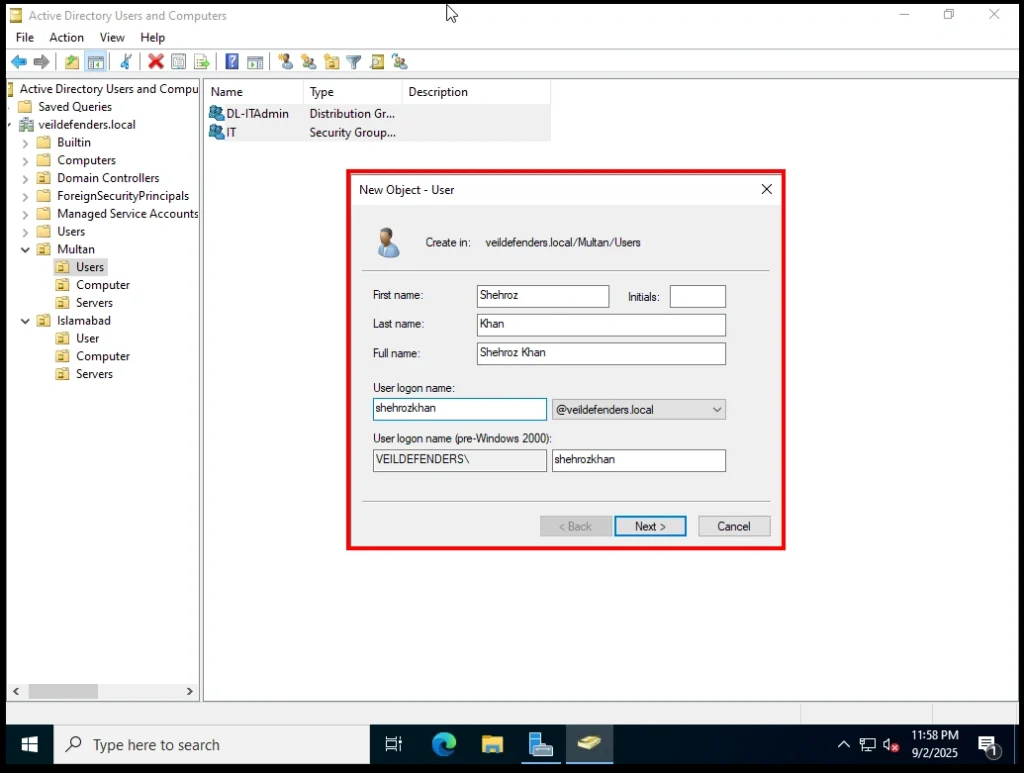
Fill in the details:
-
First Name / Last Name
-
User Logon Name (username) → e.g., shehroz
Set a password. You’ll see options like:
-
User must change password at next logon
-
Password never expires
-
Account is disabled
-
For lab testing, you can check Password never expires.
- but for that i go with option 1
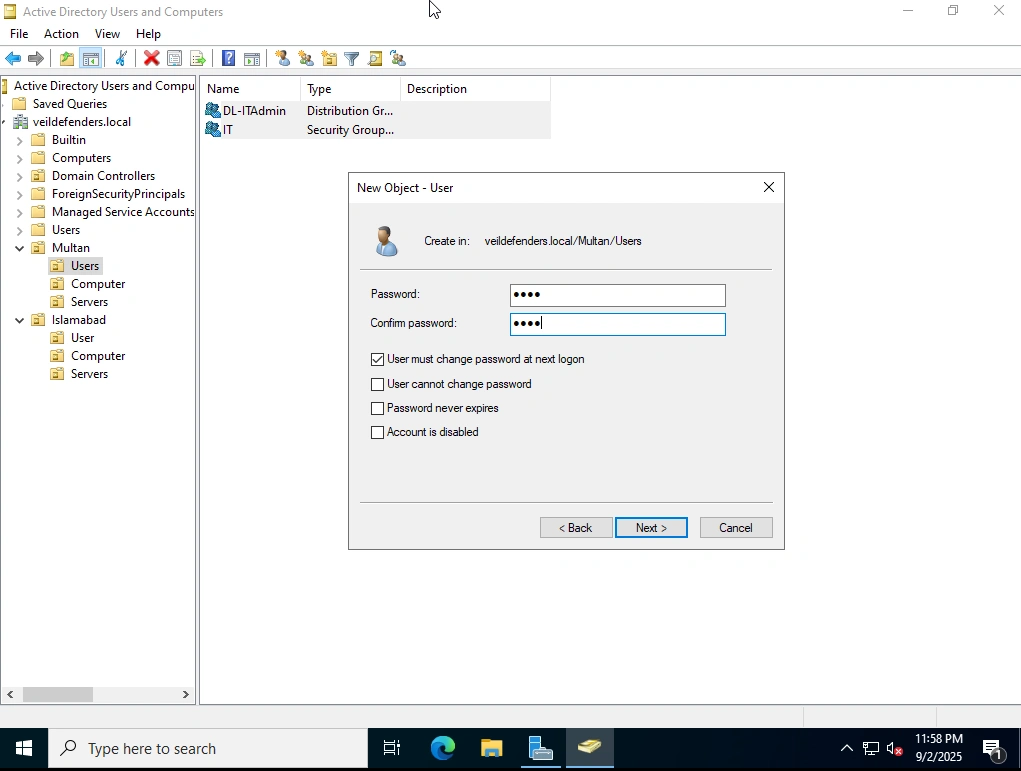
Now your new user account is created in Active Directory.
Logging In with the New User
-
Log out of your Windows Server 2022 session.
-
On the login screen, click Other User.
-
Type the username and password you just created.
-
Example:
-
Username:
VEILDEFENDERS\shehrozkhan -
Password: (the one you set during user creation)
-
-
-
If everything is configured correctly, the server will accept the login and load the desktop for that new user.
Conclusion
In this journey, we took a plain installation of Windows Server 2022 and step by step transformed it into a fully functional domain controller for our home lab. Along the way, we:
-
Installed essential roles and features such as Active Directory Domain Services (AD DS), DNS, Remote Access, and Group Policy Management.
-
Promoted the server to a Domain Controller and created our own domain (
veildefenders.local). -
Explored key concepts like forests, domains, OUs, groups, and users.
-
Organized our environment with Organizational Units (OUs), built Security and Distribution Groups, and finally created a user account to log in and test our setup.
By completing these steps, you now have a solid Active Directory environment in your home lab. This foundation will allow you to practice real-world IT administration tasks—like applying group policies, managing permissions, and simulating organizational structures—without risking a production system.
This is just the beginning. From here, we can dive deeper into:
-
Group Policy Management for applying security and desktop settings.
-
File and Printer Sharing with access control.
-
Advanced DNS and DHCP configurations.
-
Remote access and VPN setup for connecting securely.
Your home lab is now ready to grow with you as you continue learning system administration and cybersecurity.