Kali Linux Burp Suite Configuration: Setup for Beginners
Table of Contents
The following guide focuses on Kali Linux Burp Suite Configuration to help you effectively set up the tools for penetration testing. This process includes detailed instructions for Kali Linux Burp Suite Configuration, ensuring you have everything you need to start.
- Step 2: Configure Burp Suite Proxy in Firefox & Install CA Certificate
- Step 2.1: Launching Burp Suite in Kali Linux
- Step 2.2: Selecting Configuration Options
- Step 2.3: Understanding Burp Suite Interface (Proxy & Repeater)
- Step 2.4: Configuring Firefox to Route Traffic Through Burp
- Step 2.5: Handling HTTPS and HSTS Errors
- Step 2.6: Fix the HTTPS Error by Installing Burp’s CA Certificate
- You’re Ready! Begin Capturing Traffic
Introduction
Curious about penetration testing? You’re in the right place — let’s get started!
In this post, we’ll go through the complete process of setting up Kali Linux using a pre-configured .vmx file in VMware. This method is fast, efficient, and skips the hassle of downloading and installing from an ISO — making it perfect for those eager to jump straight into hands-on penetration testing.
Once Kali is up and running, we’ll configure Burp Suite from scratch. That includes:
-
Setting up the browser proxy
-
Installing Burp’s SSL certificate
-
Capturing and analyzing real HTTP requests
After the setup, we’ll dive into a real-world web attack scenario: solving the Password Reset Broken Logic authentication lab from PortSwigger.
Understanding Kali Linux Burp Suite Configuration is crucial for successfully intercepting web traffic during penetration tests.
This blog is tailored for beginner penetration testers. We’ll cover:
-
How the front end communicates with the back end?
-
How Burp Suite intercepts and manipulates data in transit?
-
Common setup issues and how to fix them?
-
A complete step-by-step exploit walkthrough?
By the end, you’ll have your tools ready and know how to use them to find and understand web vulnerabilities.
Let’s get started!
Step 1: Download and Launch Kali Linux in VMware
Step 1.1: Visit the Official Kali Linux Download Page
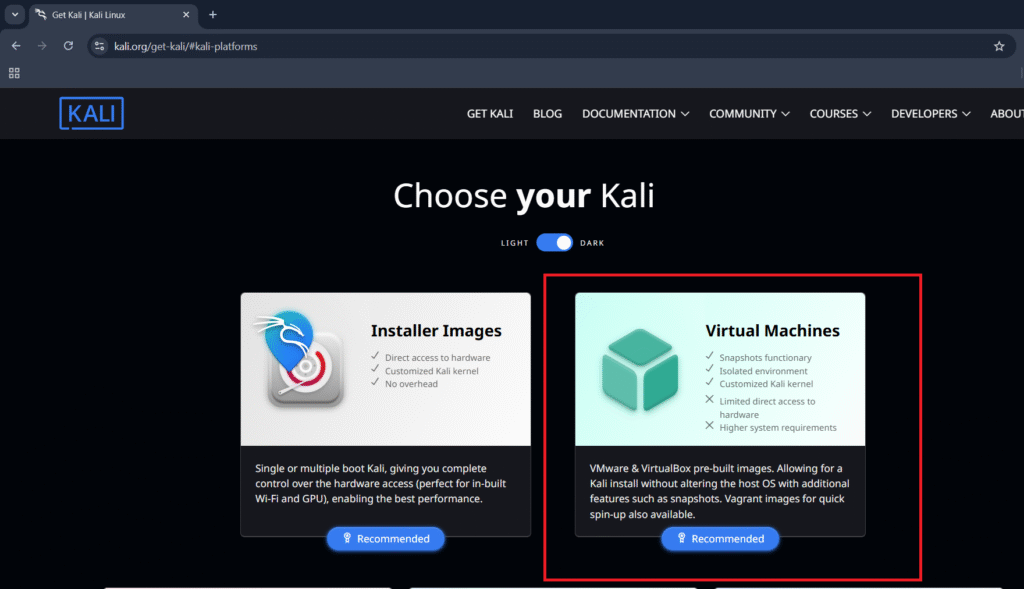
We’re starting off by downloading the Kali Linux image. Visit the official download page at https://www.kali.org/get-kali/#kali-platforms. As shown in the screenshot below, this page lists all available platforms.
Scroll down and click on the “Virtual Machines” tab — here you’ll find pre-configured Kali images.
In the Virtual Machines section, you’ll find pre-configured Kali Linux images available for multiple virtualization platforms — including VMware (with a .vmx file), VirtualBox, Hyper-V, and others. Choose the version that matches your preferred virtualization software to ensure compatibility and smooth setup.
Step 1.2: Download the Kali Linux VM for Your Virtualization Software
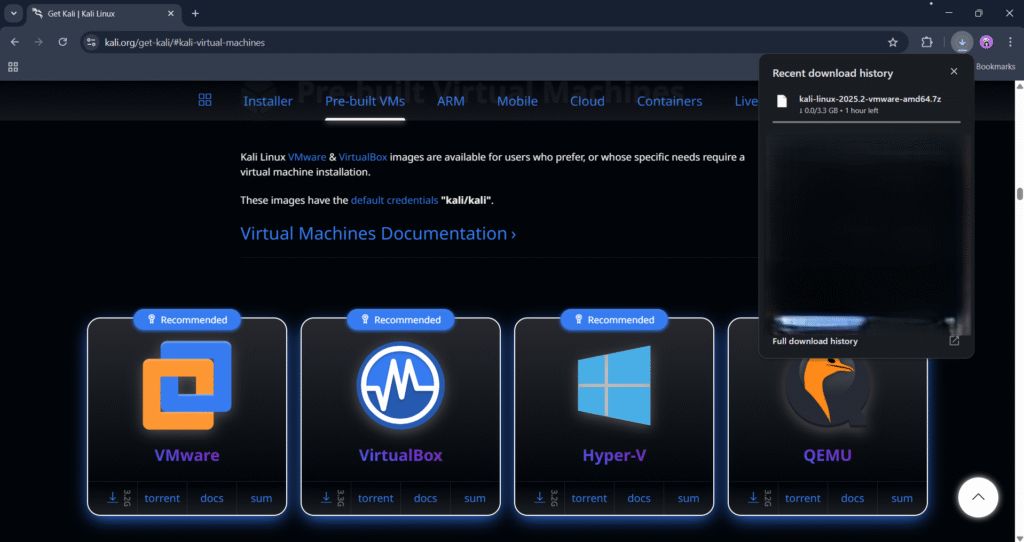
After clicking on the Virtual Machines tab, you’ll be taken to https://www.kali.org/get-kali/#kali-virtual-machines.
Here, you’ll find pre-built Kali Linux images available for a variety of virtualization platforms — including VMware, VirtualBox, Hyper-V, and more. Each version comes packaged with a .7z archive containing a ready-to-use virtual machine file.
For this tutorial, we’ll be using the VMware version, specifically designed for VMware Workstation. All further steps and configurations in this guide will be demonstrated using VMware Workstation, so make sure to download the corresponding file with the .vmx extension.
Step 1.3: Open the Kali Linux VM in VMware Workstation
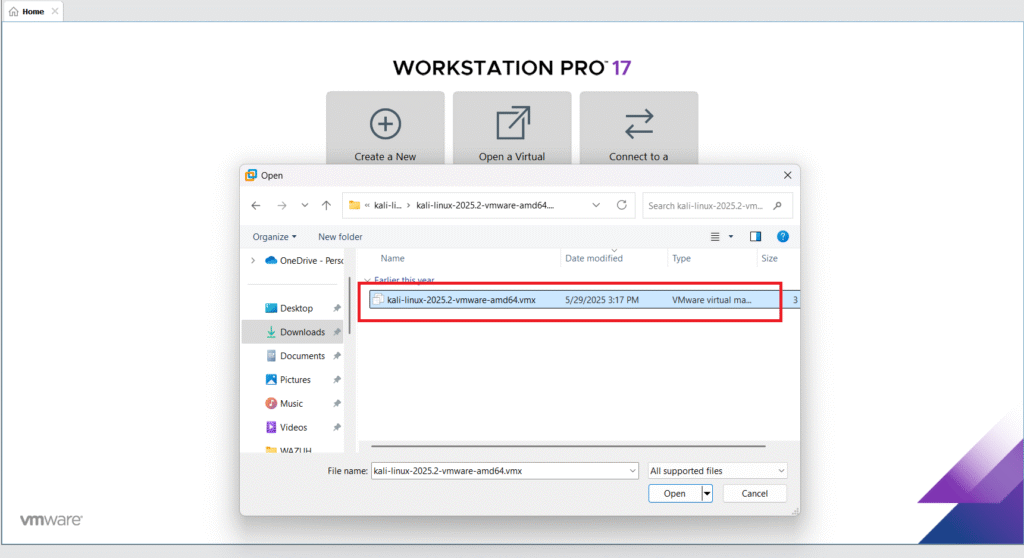
After downloading the Kali Linux .7z archive from the official website, you’ll need to extract it using a tool like 7-Zip or WinRAR. Inside the extracted folder, you’ll find the .vmx file — this is the virtual machine configuration file used by VMware.
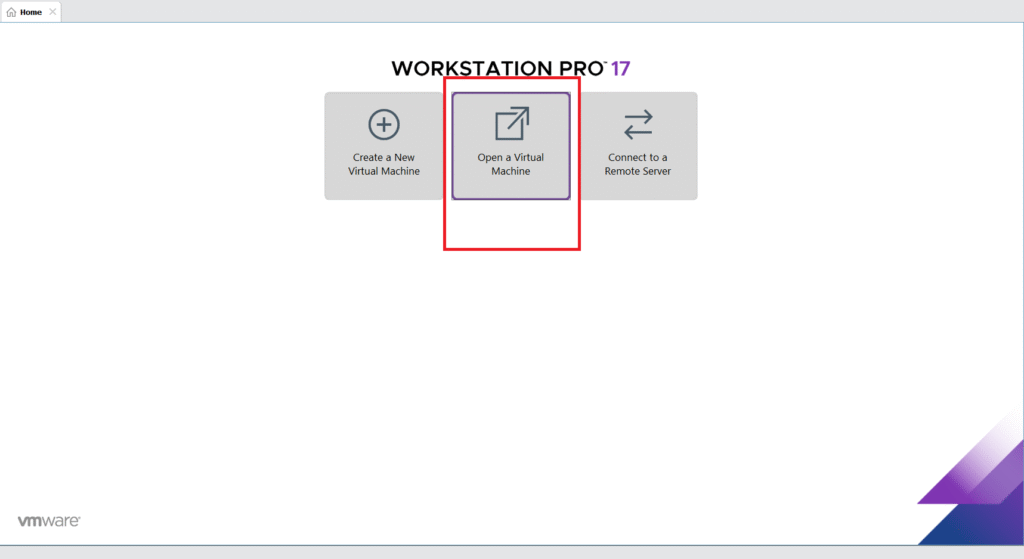
Next, open the VMware Workstation software and click on “Open a Virtual Machine” from the home screen.
Browse to the location where you extracted the Kali archive, select the .vmx file, and click Open. This will import the Kali virtual machine into VMware and prepare it for launch.
Step 1.4: Adjust VM Settings Before Launching
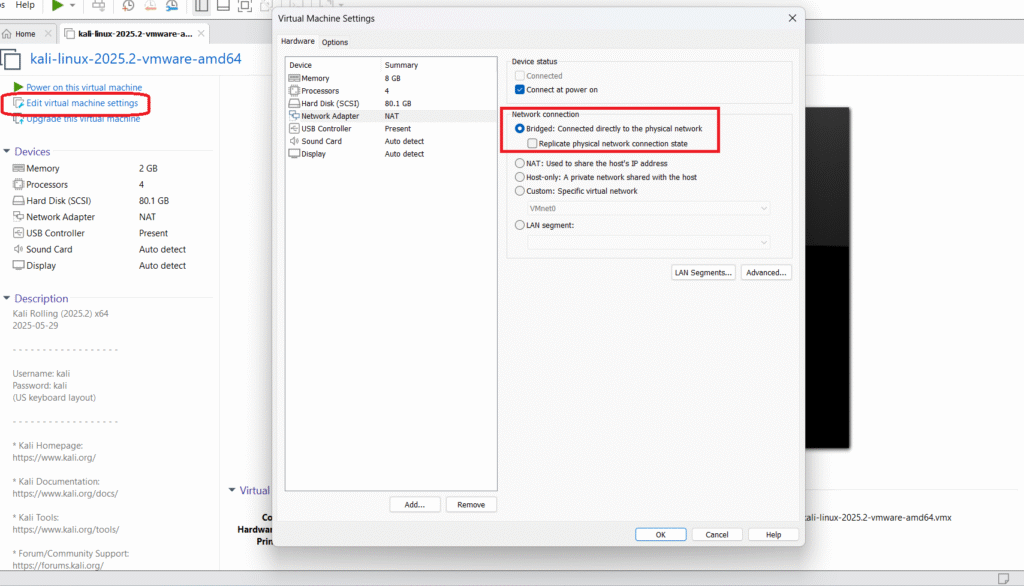
Before powering on Kali Linux, it’s essential to adjust the virtual machine settings to match your system specifications and network needs.
Start by editing the memory allocation. By default, Kali might be set to use 2–4 GB of RAM, but for smoother performance — especially while running tools like Burp Suite or Wireshark — consider increasing it to 8 GB, depending on your system’s available resources.
The most important change you should make is to the network adapter mode. Switch it from NAT (default) to Bridged. This configuration allows your Kali VM to connect directly to your physical network, just like any other device connected to your router or access point.
In bridged mode, Kali receives an IP address from your network’s DHCP server, enabling full internet access and seamless interaction with other devices on the same network — essential for real-world penetration testing, especially when testing things like spoofing, scanning, or MITM attacks.
Once these changes are made, click OK to save your settings.
Default Kali Linux Credentials
Username: kali
Password: kali

Step 2: Configure Burp Suite Proxy in Firefox & Install CA Certificate
After successfully setting up Kali Linux, the next step in your penetration testing journey is to configure Burp Suite — a powerful tool for intercepting and analyzing web traffic.
When you complete the Kali Linux Burp Suite Configuration, you’ll gain valuable insights into web application security.
🔧 What You’ll Do in This Step:
- Set up Firefox to route traffic through Burp Suite’s proxy
- Download and install Burp’s CA (Certificate Authority) certificate
- Ensure you can intercept HTTP and HTTPS traffic for security analysis
This configuration is crucial because Burp Suite acts as a man-in-the-middle proxy, allowing you to inspect and manipulate all browser requests and responses — a foundational skill for any web application pentester.
Step 2.1: Launching Burp Suite in Kali Linux
Most Kali Linux installations come with Burp Suite pre-installed. Simply:
- Click the Start menu or press the Kali search icon.
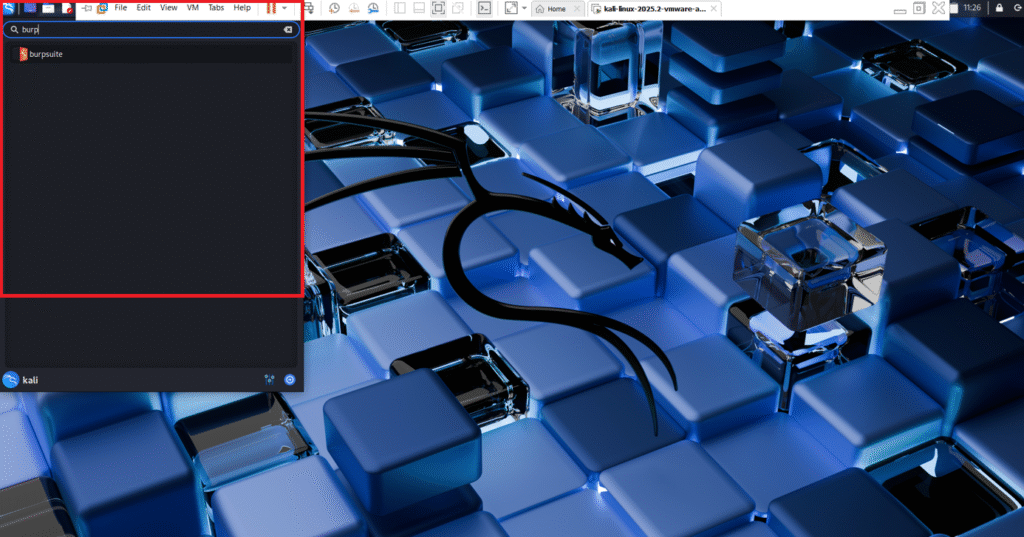
- Type “Burp” and select Burp Suite Community Edition from the search results.
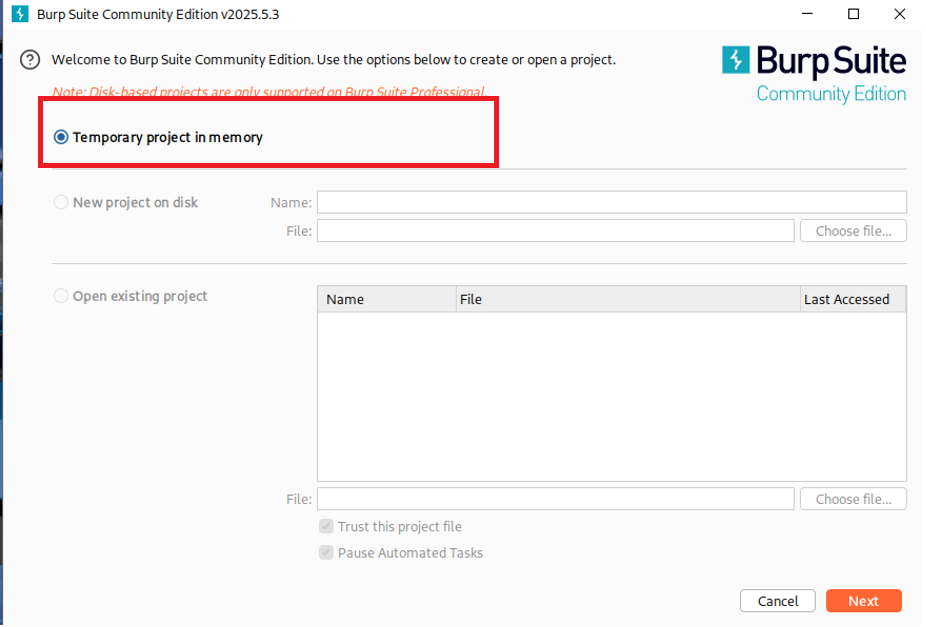
- When you launch Burp Suite, a startup window appears offering three project options:
- Temporary Project (Recommended): Ideal for quick testing without saving progress.
- New Project on Disk: Saves all work to a file on disk — great for long-term testing sessions.
- Open Existing Project: Reopens a previously saved session with all configurations and data.
For this tutorial, we choose Temporary Project to quickly get started.
Click Next to proceed.
Step 2.2: Selecting Configuration Options
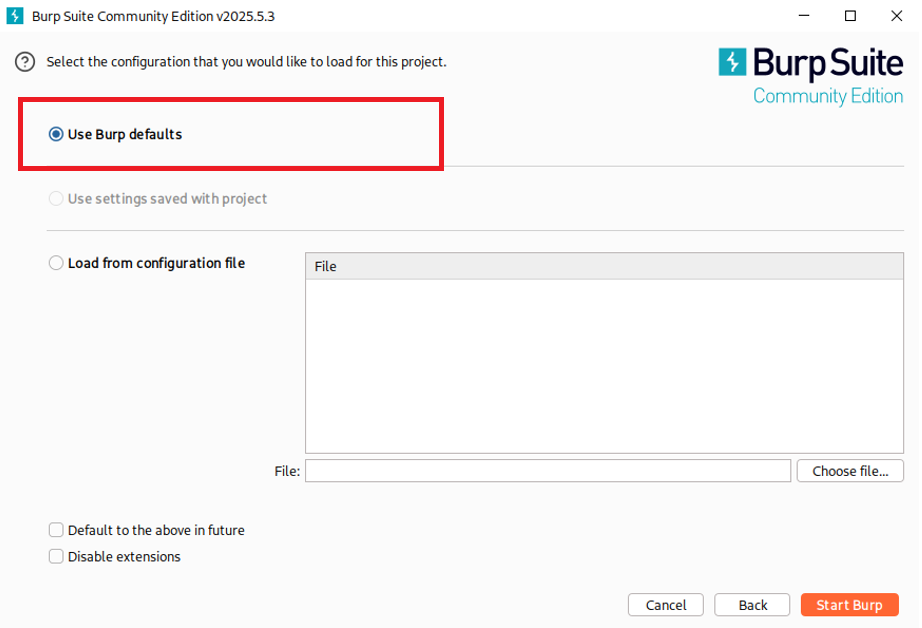
In the next step, Burp will ask how you want to configure the project. You’ll see:
-
Use Burp Defaults (Recommended): Loads Burp with default proxy, tools, and settings — best for beginners.
-
Use Settings Saved with Project: Loads custom settings from a saved Burp project.
-
Load from Configuration File: Useful if you’re importing a pre-built config.
Since this is a fresh start, select Use Burp Defaults and click Start Burp.
Once launched, Burp’s main interface will load — you’re now ready to intercept traffic and analyze web applications.
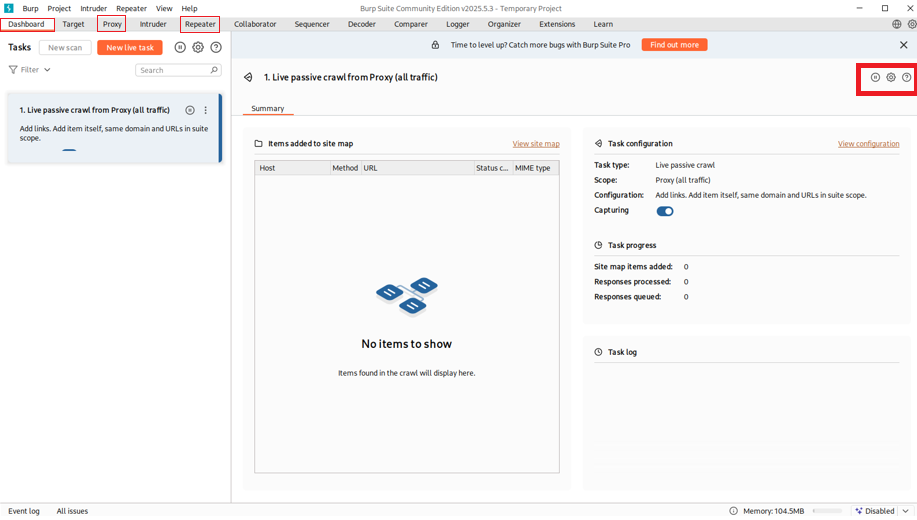
Step 2.3: Understanding Burp Suite Interface (Proxy & Repeater)
Before diving into the setup, let’s explore the two core tools we’ll focus on:
- 🔗 Proxy: Intercepts browser traffic so you can inspect requests and responses.
- 🔁 Repeater: Allows you to manually modify and resend captured requests for analysis.
We’ll mainly use the Proxy > HTTP History tab to see a full list of intercepted traffic as you browse.
Step 2.4: Configuring Firefox to Route Traffic Through Burp
To intercept browser traffic, you need to configure Firefox to use Burp Suite as a proxy.
Step-by-Step:
- In Burp, go to Setting and then Proxy > Options.
- Under Proxy Listeners, you’ll usually see:
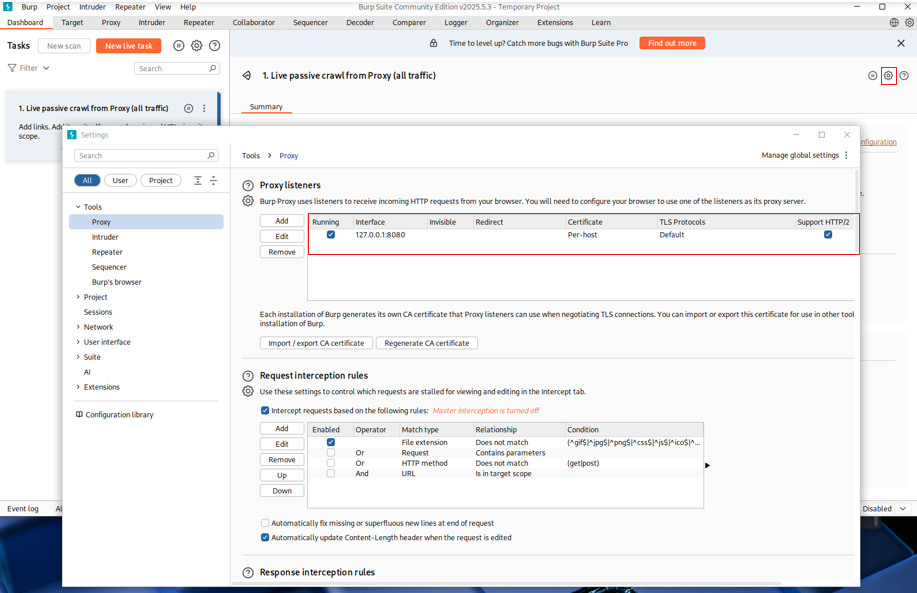
- This tells Burp to listen for traffic on localhost (your machine) at port 8080.
- Open Firefox and go to:
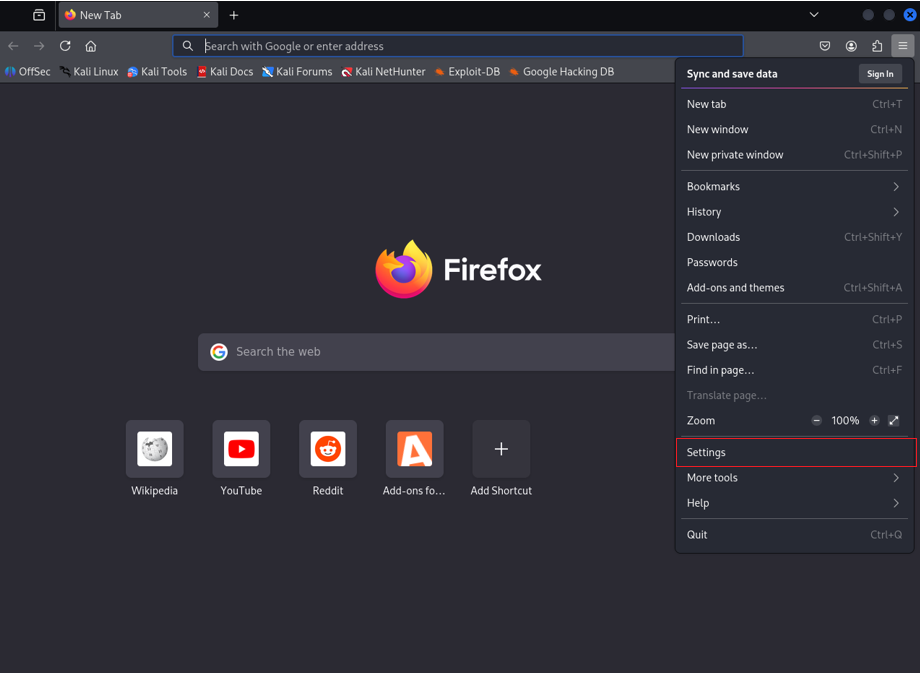
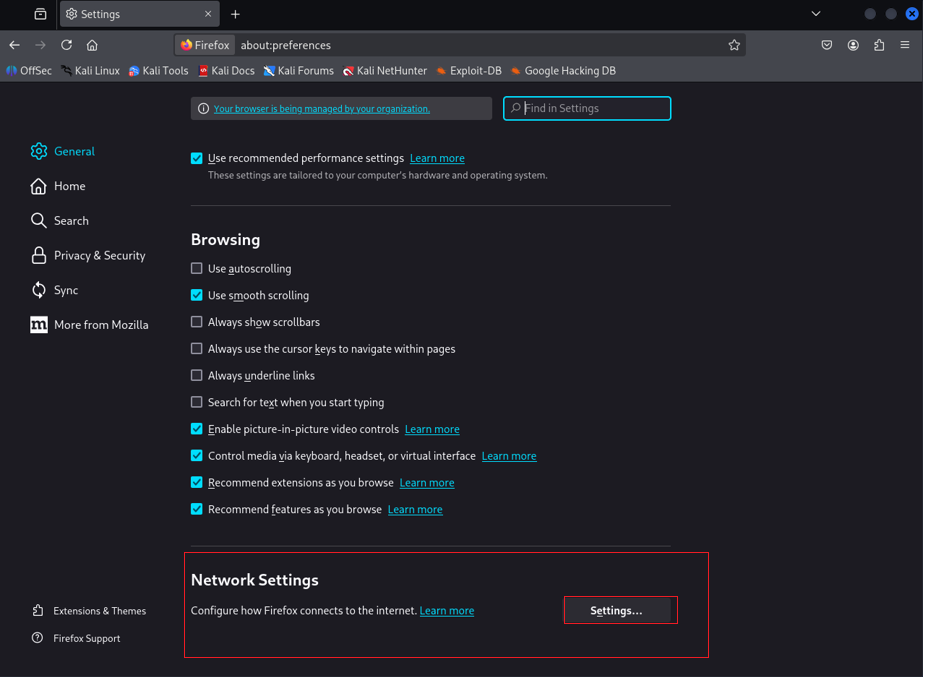
- Scroll Down to Network Setting and Click on it!
-
- In the Network settings window:
- Select Manual proxy configuration
- Enter: Burp Suit Proxy Listener interface Address
- Check “Also use this proxy server for HTTPs”
- In the Network settings window:
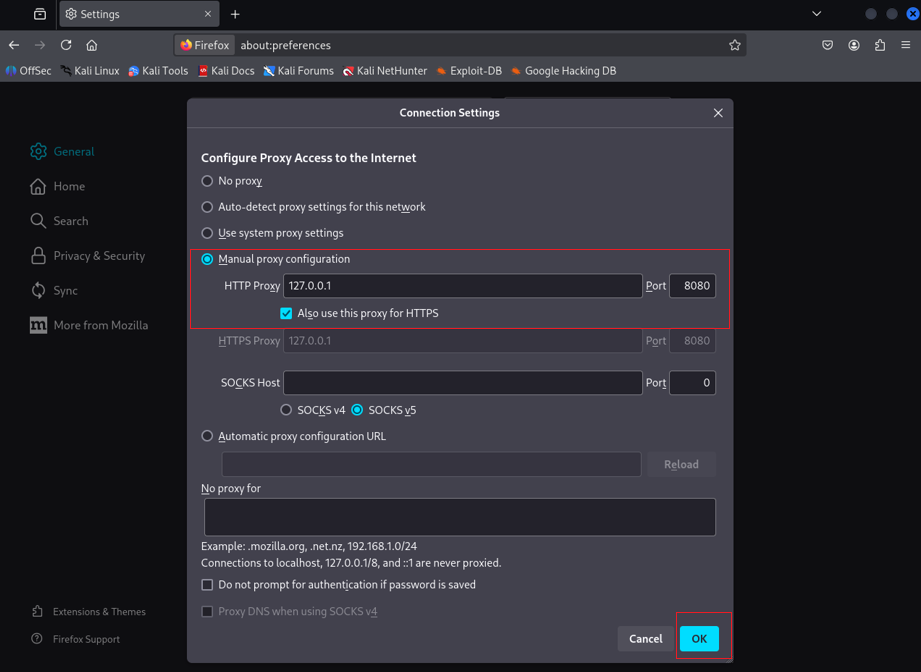
Why 127.0.0.1:8080?
127.0.0.1 refers to your local machine, and port 8080 is the default port Burp listens on. This setup ensures all browser traffic is routed through Burp.
Step 2.5: Handling HTTPS and HSTS Errors
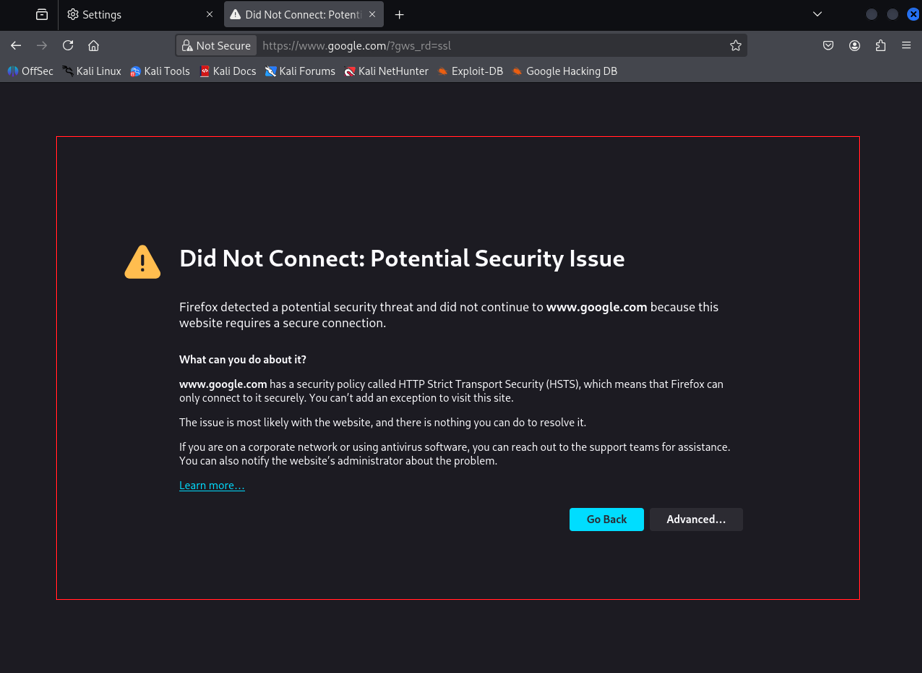
After proxy setup, try visiting a secure site like https://google.com. You’ll likely see an error:
“Did Not Connect: Potential Security Issue”
This happens because Burp intercepts HTTPS traffic, but your browser doesn’t trust Burp’s SSL certificate yet. Also, websites using HSTS (HTTP Strict Transport Security) enforce encrypted connections, which can’t be intercepted without installing the CA certificate.
Step 2.6: Fix the HTTPS Error by Installing Burp’s CA Certificate
To resolve this:
- While Burp and Firefox proxy are active, visit: [https://burp]
- Download the Burp CA Certificate from the page.
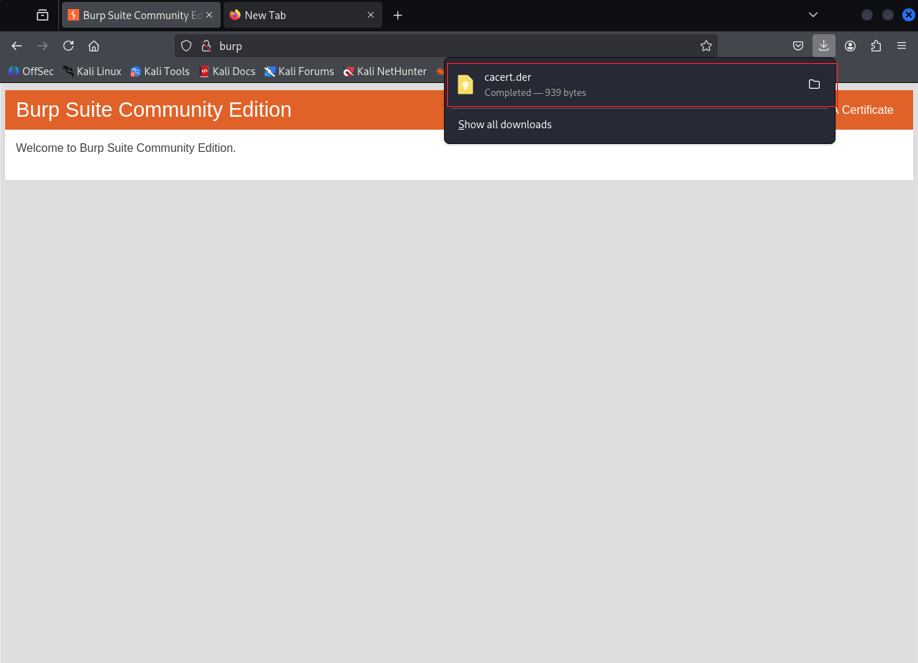
(This only works in the browser configured to use Burp as a proxy)
- In Firefox, go to:
- Settings > Privacy & Security > Certificates > View Certificates
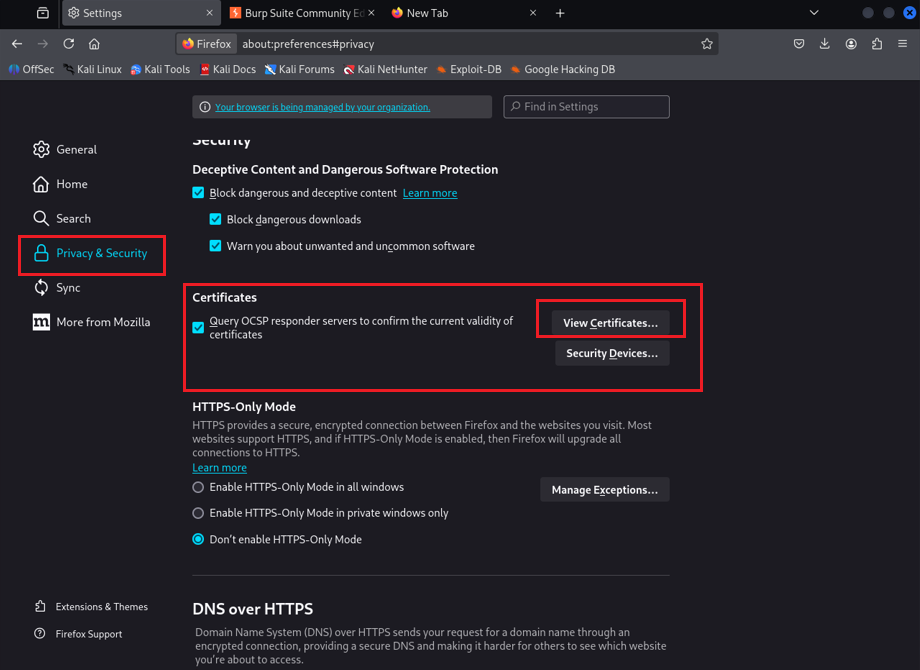
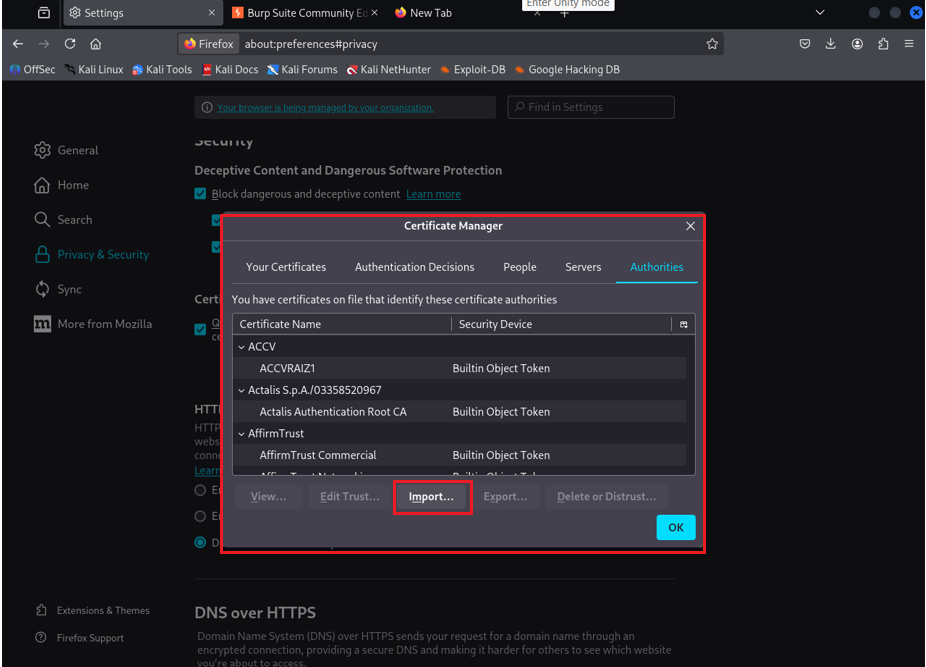
- Click Import, select the downloaded certificate file.
- In the Trust Settings window:
- Check “Trust this CA to identify websites”
- Click OK
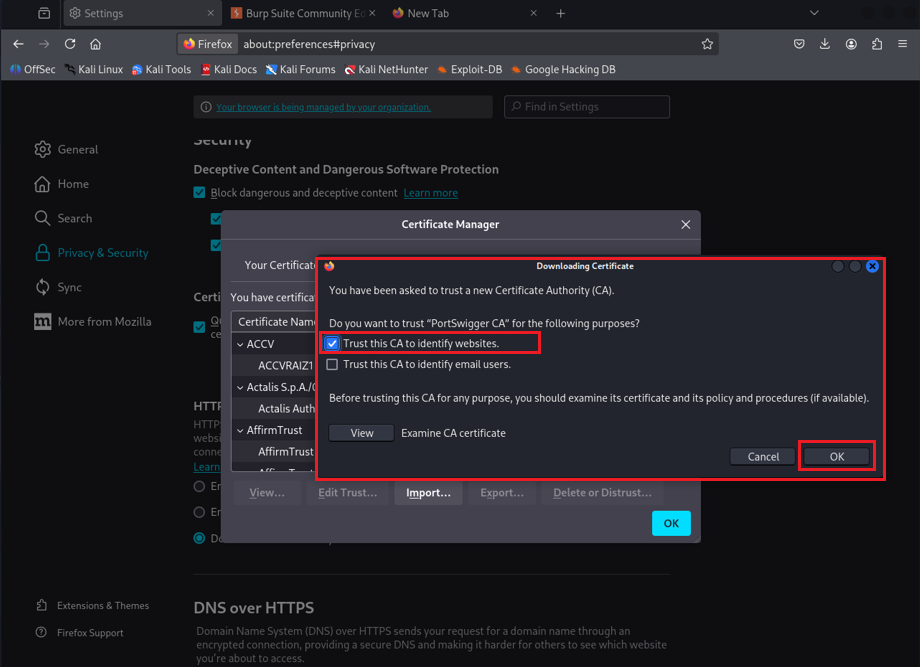
That’s it! Now Firefox will trust Burp’s SSL interception, even for HSTS-enforced websites.
You’re Ready! Begin Capturing Traffic
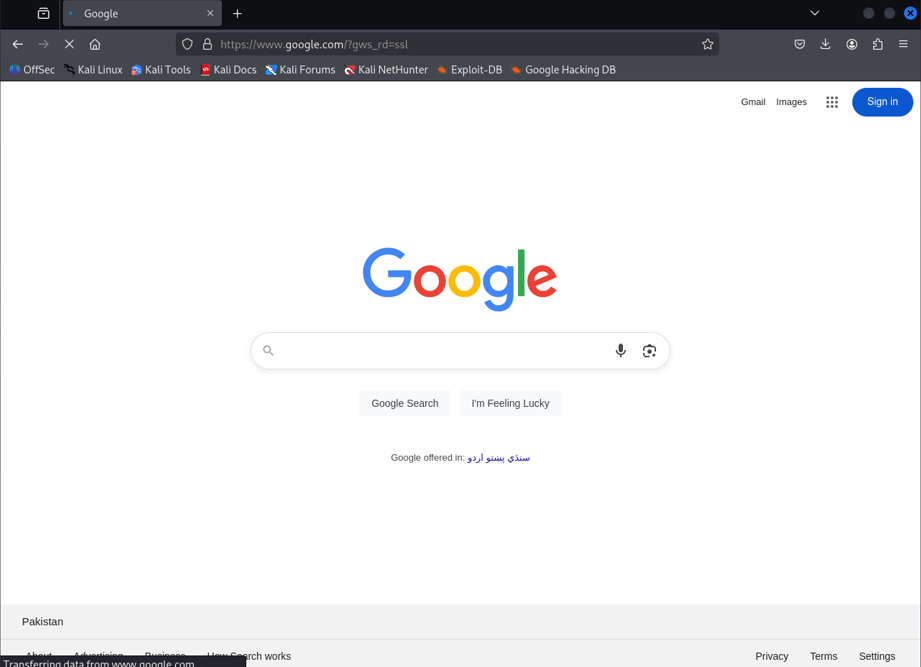
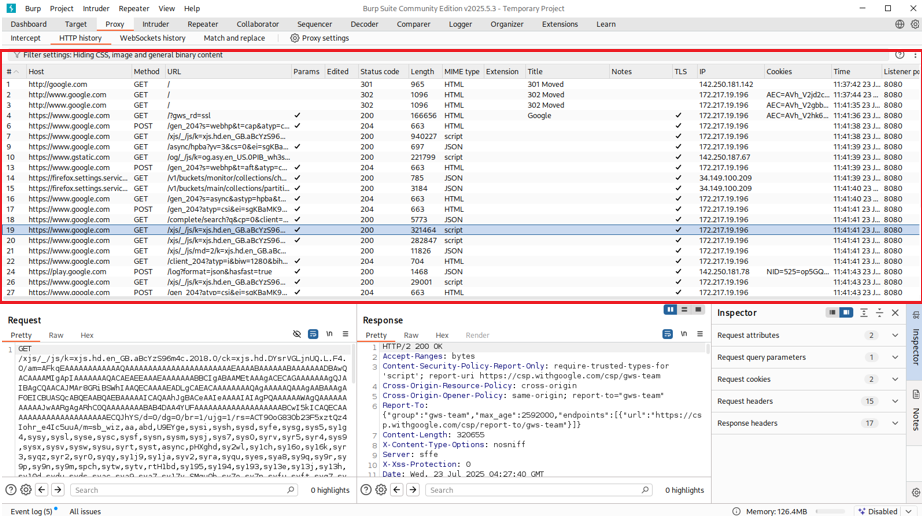
Visit any secure website — like https://example.com — and watch as the requests and responses appear inside:
With the proper Kali Linux Burp Suite Configuration, you can effectively capture and analyze web traffic.
Burp Suite > Proxy > HTTP History
You can now inspect headers, payloads, cookies, and everything in between.
Step 3: Start Your First Lab – Authentication: Password Reset Broken Logic
Now that Kali Linux and Burp Suite are fully configured, it’s time to put our tools into action.
We’ll begin with a beginner-friendly lab from PortSwigger Web Security Academy:
Authentication Lab: Password Reset Broken Logic
What Is This Lab About?
This lab demonstrates a real-world vulnerability in password reset functionality. It shows how poor logic — not just technical flaws — can lead to account takeovers. In this challenge, your goal is to:
Reset the password of a user without knowing their original password or having access to their email account.
This kind of flaw occurs when developers implement password reset features without proper verification steps — exposing users to security risks.
What You’ll Do in This Lab
- Intercept and analyze password reset requests using Burp Suite.
- Identify weak or missing verification steps.
- Manipulate request parameters to bypass authentication logic.
- Successfully change the victim user’s password and log into their account.
What You’ll Learn
By solving this lab, you’ll understand:
- Common weaknesses in password reset implementations.
- How logic flaws can lead to account takeover.
- How to use Burp Suite tools (like Proxy, HTTP History, and Repeater) in a real testing scenario.
- Basic interception, modification, and replay of HTTP requests.
💡 Tip for Beginners: Always read the lab description carefully, observe how the application behaves, and think critically about what should happen versus what is actually happening in the background.

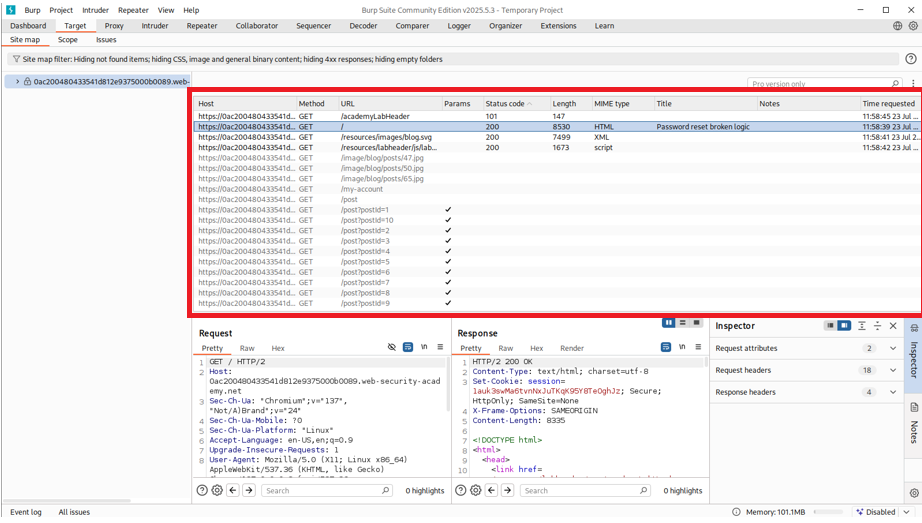
Step 3.1: Understanding Burp Suite Site Map
As shown in the screenshots, once you interact with the target application, Burp Suite captures all requests and responses into the Site Map panel.
The Site Map helps you:
- View all visited endpoints.
- See parameters, request types, MIME types, and server responses.
- Organize and analyze where flaws may exist in the application.
Step 3.2: Enabling All Filters
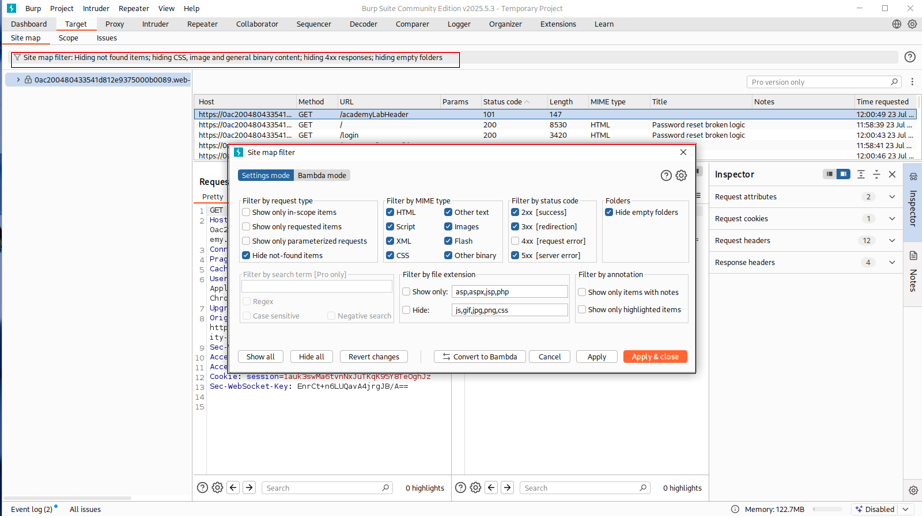
To ensure you don’t miss any critical endpoints or resources:
Go to Site Map → Right-click → Filter → Enable All
As shown in the Enable-All-Filter.png screenshot, this enables viewing of:
- All status codes (200, 300, 400, 500)
- All MIME types (HTML, Script, JSON, Images)
- All file extensions
- Even hidden or static folders
This makes your penetration testing complete and visibility-rich.
Step 3.3: Understanding the Password Reset Flow
-
- Navigate to the Lab Website:
- Start the lab from the PortSwigger platform.
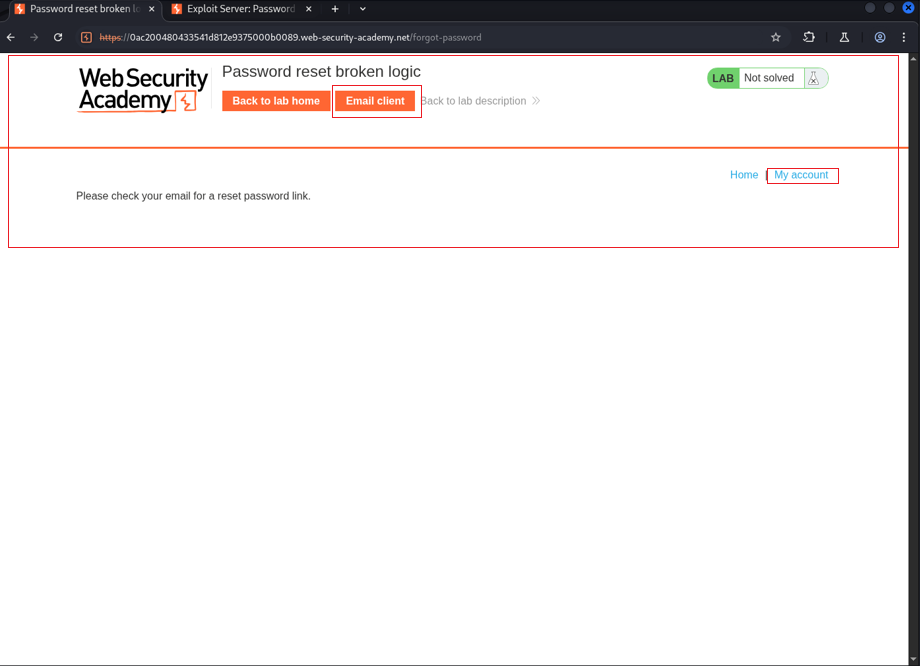
- Click on “My Account” then go to the “Forgot Password” option.
- Navigate to the Lab Website:
-
- Trigger a Password Reset:
- The site asks for a username. Enter the test username:
wiener. - Once submitted, the site sends a password reset link to the user’s email.
- The site asks for a username. Enter the test username:
- Trigger a Password Reset:
-
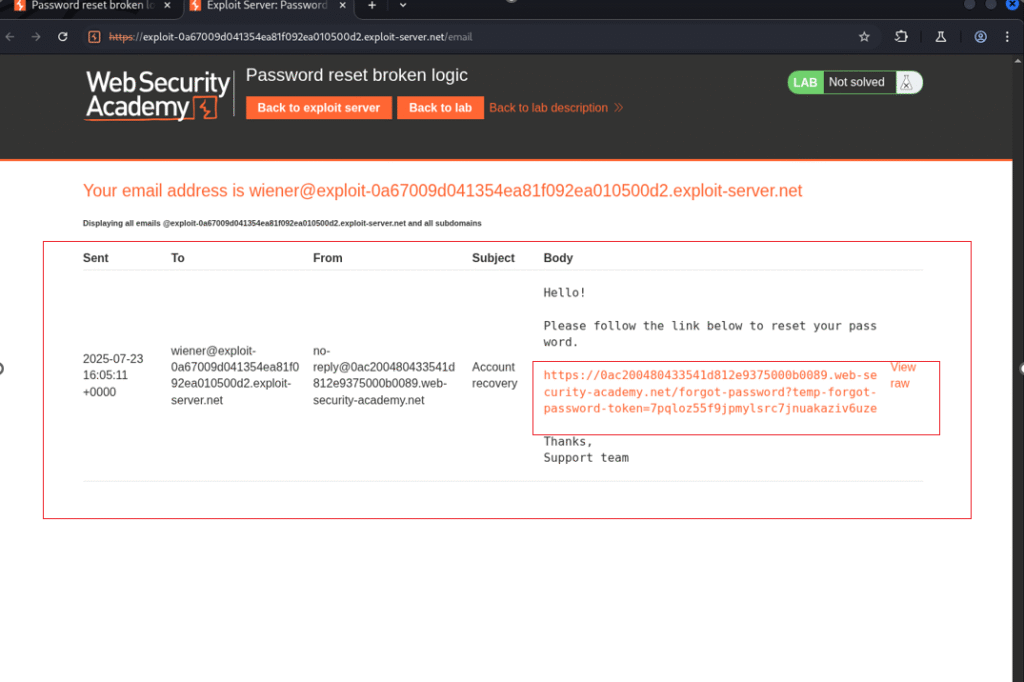
- Access the Email Server:
- PortSwigger provides a simulated email inbox for this lab.
- Open the email for user
wienerand click on the password reset link inside.
- Access the Email Server:
-
- Set a New Password:
- The reset link leads to a page where you can enter a new password and confirm it.
- Enter the new credentials and click Submit.
- Set a New Password:
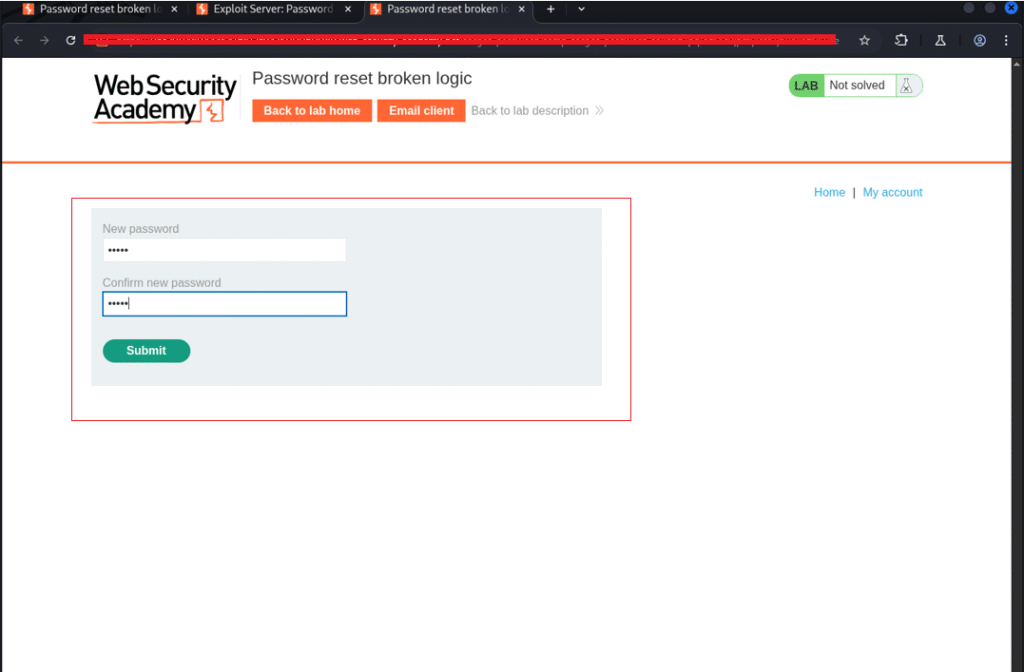
Step 3.4: Intercept the Password Reset Request
Now it’s time to inspect how the backend handles this request using Burp Suite.
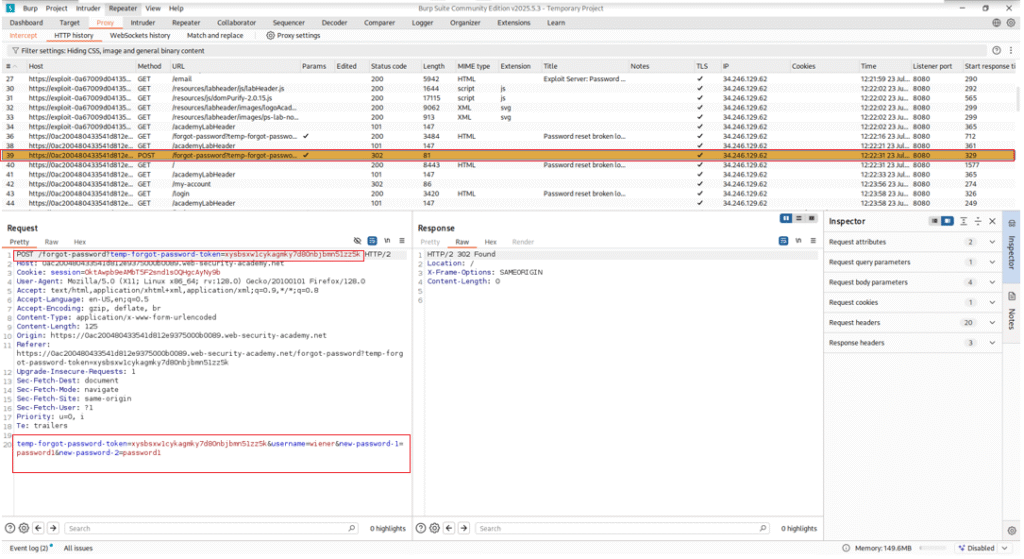
- Open Burp Suite and intercept the request.
- Look for a POST request that is triggered when you submit the new password.
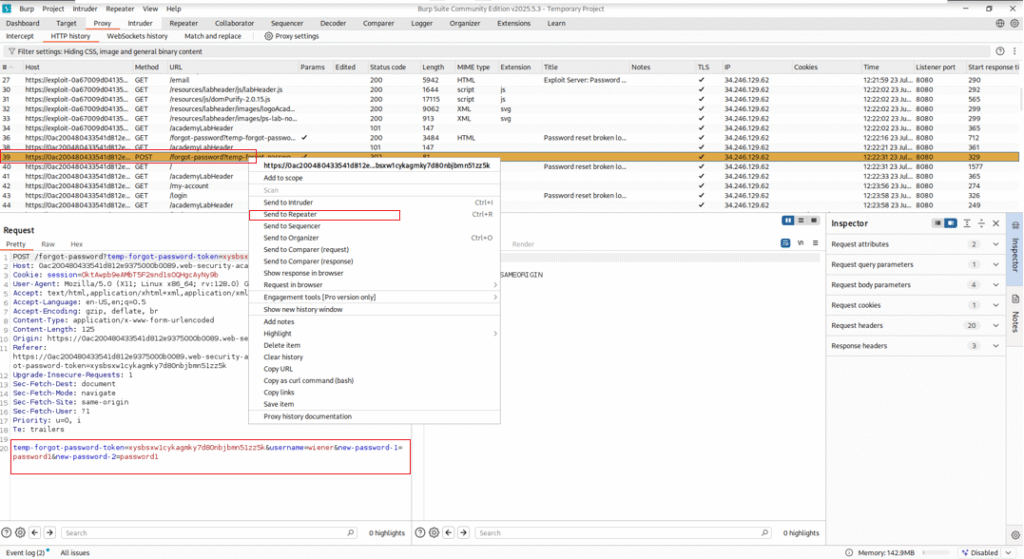
- Send this request to the Repeater tab for analysis.
- Observe that the request includes a parameter like:
Step 3.5: Identifying the Vulnerability
Here’s where things get interesting:
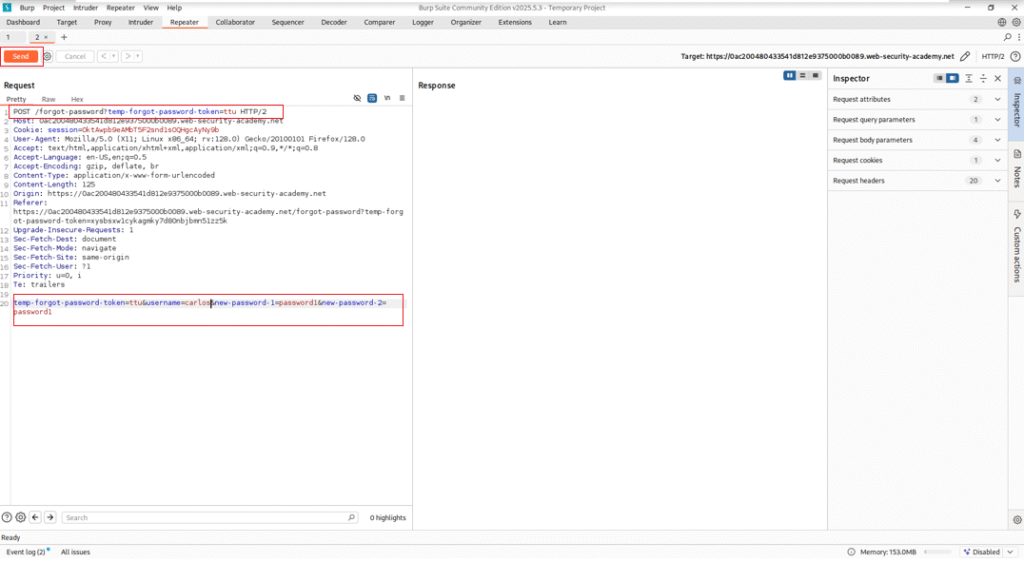
- Try modifying the token value slightly.
- Even with an invalid or altered token, the server still accepts the password change. This indicates that the token isn’t being strictly validated.
This is the core vulnerability: Broken Logic in Token Validation.
Normally, tokens are meant to be unique and tied to a single user. However, in this case, any token appears to be accepted for any user.
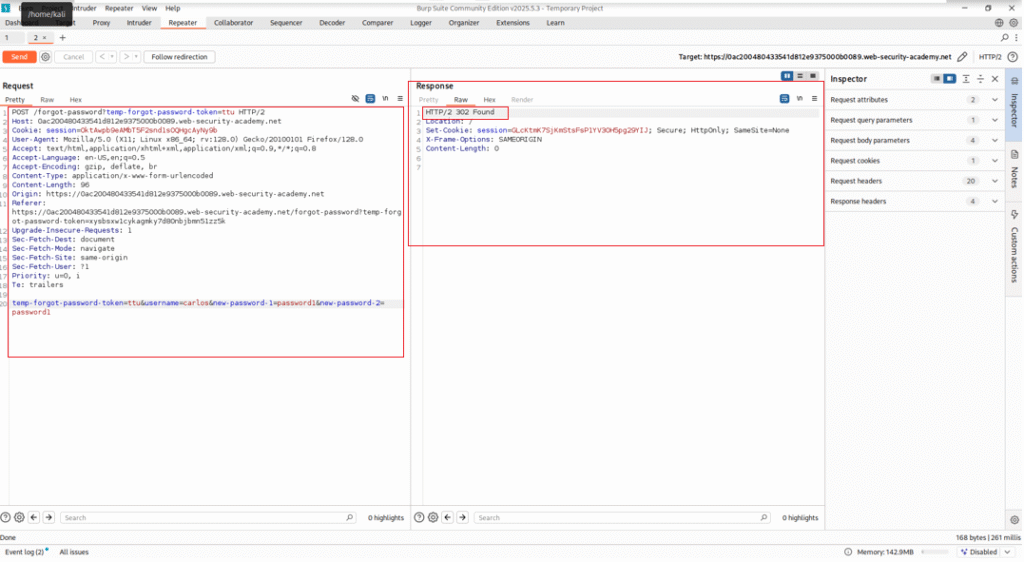
Step 3.6: Exploiting the Vulnerability
- Back in the Repeater, change the
usernamefromwienertocarlos. - Keep the same structure and password fields.
- Send the modified POST request.
If successful, the server will accept the request without error, meaning the password for carlos has been changed.
Step 3.7: Confirm the Exploit
-
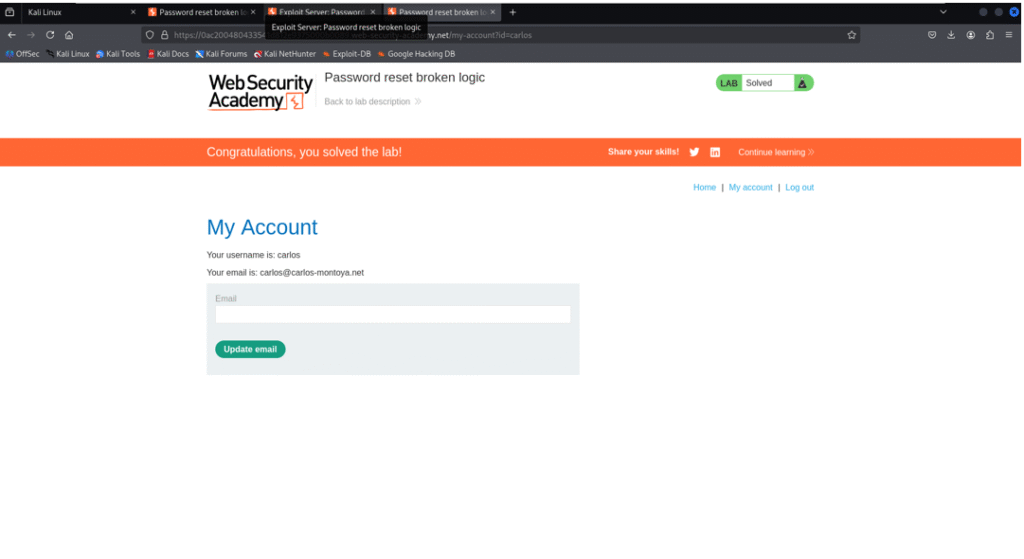
- Return to the login page.
- Enter the credentials:
- Username: carlos
- Password: the one you just set in the modified request.
- You’ll successfully log in as
carlos— and the lab will display a “Lab solved” confirmation.
Conclusion
We’ve set up Kali Linux, configured Burp Suite, intercepted our first request, and even completed a real-world lab from PortSwigger. If you’ve followed along this far—nice work! It might seem like a lot at first, but trust me, with every lab you do, things will start to click.
As you progress in your cybersecurity journey, mastering the Kali Linux Burp Suite Configuration will be vital for your success.
Cybersecurity isn’t just about tools—it’s about mindset, curiosity, and patience. So don’t rush it. Break things, test ideas, and learn from every step.
If you enjoyed this walkthrough or got stuck somewhere, feel free to drop your thoughts or questions. Also, if there’s a specific topic or PortSwigger lab you want me to cover next, let me know—I’m planning to drop something new every week to help you level up in this field.
Don’t forget the importance of proper Kali Linux Burp Suite Configuration as you explore this field.
Till then, stay sharp, keep exploring, and happy hacking.
—Shehroz 💻🔐


